Managing waitlist requests properly helps you minimize waste and maximize opportunities to fill your event seats. There are three key steps to managing waitlists in EventsAir:
- Enable Waitlist Payment Statuses.
- Enable the Waitlist option in interactive (registration) sites.
- Process Waitlist requests with the Waitlist Management Express Action.
Enable waitlist payment statuses
You can enable waitlist payment statuses for any Function, Registration, Accommodation or Travel module item with a set inventory level.
In the Setup panel, under the relevant module (e.g. Functions), look under the particular item (Function) setup, under the Advanced tab.

Enable one or both of these payment statuses:
- Waitlist Purchase - charges the item fee immediately
- Waitlist No Payment Required - won't charge the item fee
Enabling one or both of these options means they'll be available for you to choose when setting up Waitlisting on a registration site for this item.
Later, you'll use the Waitlist Management Express Action to decide how to handle each of the above (e.g. convert to purchase, cancel, etc.)
Add a waitlist to your interactive (registration) site
When you add a Registration, Function, Accommodation, or Travel item to an interactive (registration) site with either one or both Waitlist Payment Status[es] enabled, you can turn this feature on.
Click the cog icon in the appropriate element in the Site Builder.
When you expand the Setup options for a specific item, you'll see the option to enable the waitlist, and other options you can configure:

- Enable Waitlist - turns on Waitlisting for this specific item.
- When Inventory Limit is Below - starts the Waitlist at this limit, so you can keep some tickets/places in reserve. For example, if you enable waitlisting when the remaining inventory is below 10, the remaining nine tickets will be held aside as a reserve, and any new requests will be put on the Waitlist.
DON'T ENTER ZERO HERE - 1 is the lowest number (i.e. this will trigger when there are no tickets left. Entering zero will potentially cause problems.] - Waitlist Label - the default text (you can change this).
- Waitlist Message - the default message (you can change this).
- Waitlist Payment Status - choose which Waitlist Payment Status will be allocated for this item (when the waitlist is activated).
When an attendee chooses a Waitlisted item that's reached its Inventory Limit, they'll see a message similar to the below: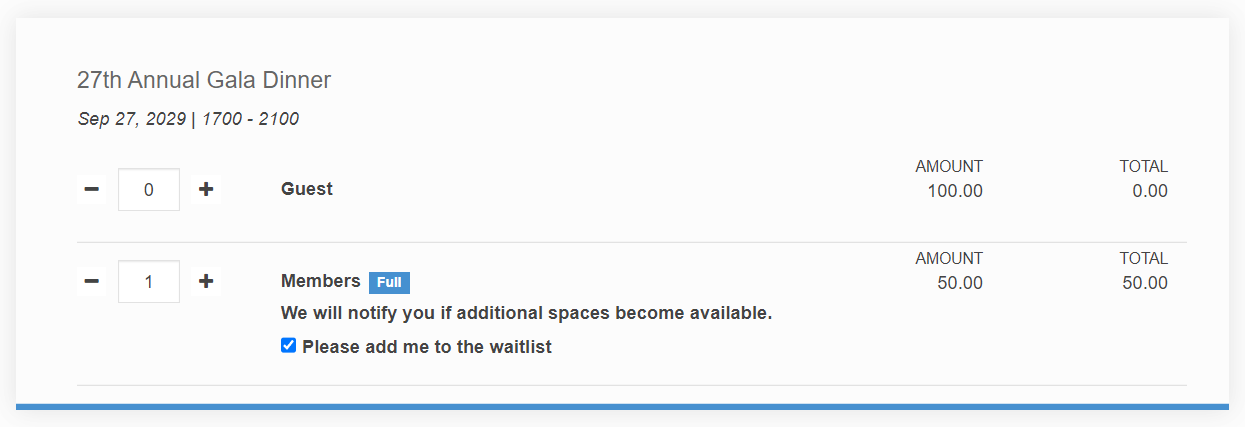

Run the Waitlist Management Express Action
When you're ready, run the Waitlist Management Express Action to determine whether an attendee will be allowed to:
- purchase a seat/ticket [or allowed to have a seat/ticket with some other payment status such as inclusive or complimentary]; or
- have the item canceled on their record.
You may want to email people whose waitlist status has changed. To do this, you can save the list of those you filter for (when running the Waitlist Management Express Action) as a Data Snapsot. Then use the Data Snapshot as a filter when sending out your communication. NOTE: The Data Snapshot doesn't update - it's just the 'snapshot' of who matched the filter at the time it was run.
If you have too many tickets reserved
After running the Waitlist Management Express Action to clear any outstanding waitlist requests, you may have too many tickets in reserve. You can change or disable the waitlist settings on the interactive (registration) site and just allow these tickets to be purchased normally.