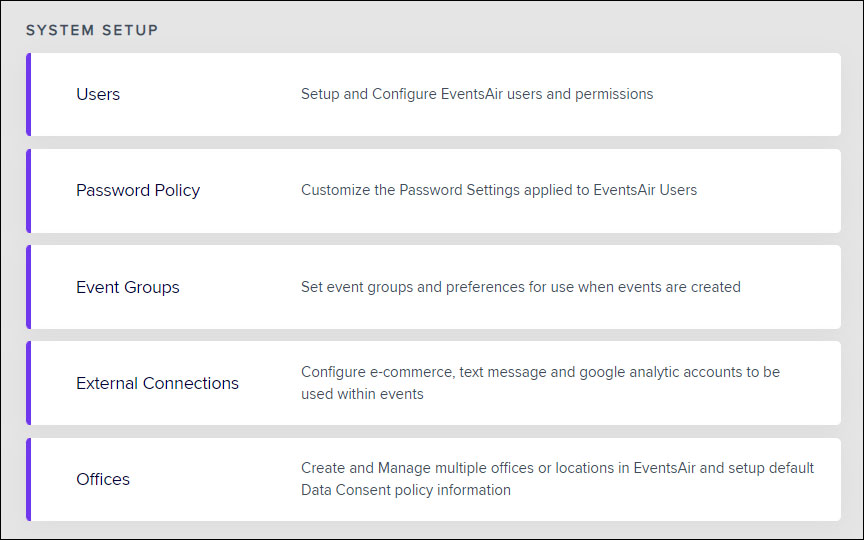
In Application Setup - SYSTEM SETUP, you can define a variety of important core settings. These settings are global, meaning they apply to ALL events you create in the EventsAir platform:
- Users - set up users and user permissions
- Password Policy - customize password settings for all users
- Event Groups - define event groups so you can categorize events
- External Connections - configure e-commerce (payment gateways), text gateways, Google Analytic accounts, and Branding for Custom Native Attendee Apps
- Offices - Define multiple offices or locations for using EventsAir (this feature may cost extra - talk to your Account Manager)

Users
This is where you set up all EventsAir users within your organization. Each user will be assigned specific access/security levels. Areas that can be assigned or hidden include:
- EventsAir Panels
- EventsAir Modules
- Event Setup
- Credit Card Vault
- etc.
Selecting Administrator gives full access to all modules and panels in EventsAir.
For users who aren't an Administrator, you can control access to each of the EventsAir panels. You can hide them, grant read-only access, or allow the full Add/Edit/Delete functionality. The Setup section has further options:
- Event Setup - [is this user allowed to edit the Event Setup Screen?]
- Create New Events - [is this user allowed to create brand new events in EventsAir?]
- Lock/Unlock Setup - lets this user see the lock/unlock symbols in the Setup area. This would let them lock an area of setup so that no more changes could be made (except by Administrators, or other users with this Lock/Unlock permission). This can also be used to stop creation of new items in the Agenda - look for the lock icon on the Agenda screen.
Usernames - security
When you're creating users, it's important that usernames are unique and aren't re-used later. Using generic names (i.e. not linked to a specific person - for example "Admin1" instead of a first name) may indicate a shared account, especially if linked to a generic email address such as "admin@mycompany.com". For security, and for GDPR and PCI compliance reasons, shared or generic accounts aren't allowed under the EventsAir Terms of Service.
If a username is not unique (has been used previously) OR if it includes a special character (including "&" or letters with diacritical marks such as accents "é" and umlauts "ä, ö, ü"), the user will have problems logging into the Fast Track learning environment.
If a user leaves or no longer requires EventsAir access, make sure their account is deleted or deactivated and the details are not re-used. You can have different users logged in each month if needed, and deactivating an account will allow you to restore it later.
If you're unsure about any of this, please reach out to your Customer Success Specialist or Account Manager for further information.
User Types and Roles
There are pre-defined user types and roles that you can select. Each gives a default set of rights and permissions that can also be easily modified for a specific user.
User Types include:
- Application Administrator - allowed to manage all aspects of EventsAir across all offices
- Office Administrator - allowed to manage all aspects of EventsAir for a nominated office or offices
- User - various user roles are available:
- Event Manager
- Finance Manager
- Registration Manager
- Registration Assistant
- Exhibition/Sponsorship Manager
- Speaker Manager
- Accommodation or Travel Manager
- Data Administrator - can search for Anonymized records from the Attendee Panel.
Data Administrators
You can assign any EventsAir user at any level the authority to act as a Data Administrator. This lets the user search for Anonymized records using encrypted name, email or phone numbers from within the Attendee Panel. Data Administrators can also search by these encrypted contact details in the Contact Locator.
While in the Contact Locator tool, Data Administrators can also generate Data Processing Statements and delete contact records in bulk across multiple events.
For more information, read this article about the Contact Locator Tool.
User Passwords
Your users should choose a strong password - for example, at least 7 characters long - and they should change passwords every 3 months. A strong password should include:
- at least one upper case letter
- at least one lower case letter
- at least one symbol
You can enforce these in the Password Policy section (see more information below).
Assigning Users to Offices
If you've purchased the optional Offices feature in EventsAir, you can create multiple office locations, and assign events and users to specific locations.

You can make temporary or permanent assignment changes at any time if your staff situation changes.
You can read more about the Offices set up later in this article.
Password Policy
This section lets you define the length, content and re-use settings for passwords. You can select from two different policy types:
- PCI v3.0 Compliant- this is the default password policy for EventsAir:
- Passwords must be 7 characters or more
- Passwords must contain a capital letter
- Passwords must contain a special character
- Extended PCI v3.0 Compliance- this lets you fine-tune the following additional settings to match your organization's policy:
- Minimum Password Length - passwords must contain at least this many characters
- Password Must Contain Numbers - passwords must contain at least one number
- Cannot Reuse the Last (x) Passwords - users cannot not re-use passwords they have recently used
- Password must be changed every (x) days - every (x) days the user will be asked to change their password (e.g. Every 30 days.)
- After (x) unsuccessful attempts the user will be locked out for (y) minutes - help prevent brute force attacks with this setting. For example, after 3 failed attempts at logging in, you could freeze that account for 30 minutes.
Update User Account
Users of EventsAir (your team) can always change their email address, add a profile picture, and reset their password by clicking on the Update User Account icon located in the top right corner of each screen in EventsAir (next to the Help icon).
Multi-Factor Authentication
You also have the option to enable multi-factor authentication via the Two-factor Authentication Required check box. Once enabled, you can set the delivery method to email or email or SMS. This will send a verification code that needs to be entered after logging in to confirm access EventsAir.
NOTE: If you are using the SMS option, you will need to select your Text Message Gateway. These can be set up under external connections and will need to have credits on them to send messages.

Data Processing Consent Policy
Whenever you first engage with a contact, such as event registration or marketing communications, you can display these default Data Processing Consent Policies, informing them in clear and easy to read language how their personal data will be used by your organization. After reading these statements, you will ask the contact to agree, or Consent to having their personal data used for your event management purposes.
Alternately, you could also allow them to decline participation, or Withdraw Consent. In this circumstance, you would either remove the contact from your marketing activities or terminate the current registration process.
Data Processing Consent policies are legally binding statements shown to a contact before they submit their personal information during event registration or using the Attendee App. These statements describe how you plan to use a contact’s personal data, including:
Data Consent Tab
- Your organization’s contact details
- Your Data Protection Officer’s details
- Your purpose in collecting personal data
- Any third parties that would view or receive personal data (such as hotels or clients)
- How long their personal data will be stored by you
- Any additional information regarding your use of the contact’s personal data
- Withdrawn Consent Messages
- Attendee App Personal Data policy
Data Log Settings Tab
- Terms of Use for Quick Exports and Quick Reports by third parties
- Email communications for advising third parties about use of personal data
Resources for Consent Policies and other default text
Default text is not provided since every EventsAir user will develop their own unique Consent Policies appropriate for their organization.
However, at the end of this article about EventsAir's Data Protection Toolkit there are example Consent Policies that you can reference and modify for your organization’s use.
Event Groups
This is where you can define different types of events or meetings (a group of events you manage for a particular client, workshop series, sales meetings, etc.). Some examples of Event Groups could include:
- Technology Conferences
- Sales Meetings
- Education Series
- Southwest Regional Meetings
- Jensen Corporation Meetings
- Excalibur Corporate Internal Meetings
Event Groups are an extremely useful search filter for reports and export. You can also filter on Event Groups for communications, accounting, attendee search and any other area that lets you filter and target fields in EventsAir.
External Connections - Gateways
Text Message Gateways
If you want to send text messages from EventsAir, you need to have set up Text Message (SMS) gateway.
Read more about setting up your SMS Gateway.
You should select the name of your specific Text Message or SMS service provider. You'll also need to include:
- Number prefix
- Username
- Password
The exact fields required depend on the individual gateway service.
You can set up multiple Text Message gateways if you use multiple services.
E-Commerce Gateways (Payment Gateways)
This is where you can select and configure your E-Commerce Gateway (a web-based service you subscribe to, that connects credit card information in EventsAir to you or your client's merchant credit card account). The payment gateways currently supported by EventsAir are shown in the drop-down list.
We also offer a fully-integrated payment gateway: EventsAir Pay.
Most gateways charge a monthly fee and a transaction fee of a small percentage of each transaction (something like 1.5 percent plus a few cents per transaction). Please talk to your Account Manager to find out more about supported payment gateways.
If you subscribe to a payment gateway not listed, please contact EventsAir Technical Support to put in a request for your gateway service. However, please note this would only be a request, and there are no guarantees that EventsAir will support your current gateway.
Each payment gateway will require 2-3 pieces of information from the gateway settings, such as transaction key or API login code. Your payment gateway provider will also work with you to help you connect to your merchant account, and test that connection. Once you set up the gateway connection in EventsAir, you should do some test online transactions into the gateway to confirm the transaction is present, and void those transactions prior to settlement (which usually occurs once a day, near the end of the day).
Once your gateway is set up for your own company (or for a specific client) it can be re-applied to all future events without the need to re-configure or test.
PayPal Accounts
EventsAir can connect directly to a PayPal account, avoiding the need for a merchant credit card account and a gateway to communicate with it. PayPal accounts are often used for smaller businesses.
To set up a PayPal account, you will need the following information:
- Name
- PayPal App Client ID
- PayPal App Secret
Email Accounts
The default email configuration in EventsAir delivers emails via SendGrid, and the recipient will see the sender address as “from EventsAir on behalf of….[the sender name you’ve entered].” For more information on Email Domains, check out the More about email domains section below.
If you prefer to have your emails appear to have come from your own domain, there are additional steps you need to take - talk to your Customer Success Specialist for more information.
If your organization sends out large numbers of emails, whether for large events or large marketing efforts, you may wish to use your own email server. You can do this by creating an External Connection to your own SMTP Server. Using this option means SendGrid does NOT manage delivery of your emails. To set up a connection to your email server in EventsAir, you’ll need the following details from your email domain account:
• SMTP Server
• SMTP Username
• SMTP Password
In EventsAir, from the opening dashboard, click Application Setup (top right).
Click on External Connections (on the left side of the page, under SYSTEM SETUP).
In the left-hand panel, look for Email Accounts and click the plus sign + to add your new account.

Fill in the details and select Save.
If you have multiple email servers, you can set all of these up, and just choose the one you want as the “Send Email From” option when setting up each event (in Event Setup/Event Preferences/External Connections),
Analytic Accounts
This is where you can configure EventsAir to integrate with your Google Analytics account. These accounts are free to set up, and you can link as many domains or URLs as you wish. To integrate a Google Analytics account in EventsAir, you will first need to configure your account here.
Once you have created your Google Analytics Account, you will need to provide this information:
- Name - any name you wish to use to identify this account
- Account ID - found in your Google Analytics configuration
- Username (Email) - the user name you use to access this account
Social Media API Account Setup
This is used to connect to your Facebook or Twitter advertising platforms whenever you use the EventsAir Social Media Marketing Automation tool. Click here to view the help topic on Social Media Marketing Automation, which includes the steps needed to set up the Social Media API Account.
Session Live Streaming
These external connections are used to connect your Live Streaming Platform (typically webinar services) so you can Live Stream your sessions as required. Read more here.
More about email domains
To enable this feature, you need to have a change made to your domain name so that we can legitimately send email from your domain, otherwise your attendee emails will likely be seen as spam.
You will also need to instruct your IT manager, or the company that you purchased your domain name from, to add or amend the SPF record on your DNS.
NOTE: You should also make sure your IT department has an SPF record for SendGrid set up on the domain you want to send from. This will help stop emails going to junk in most cases. The information below may be helpful to your IT department:
Example SPF record
Example of SPF record: “v=spf1 include:eventsairmail.com -all"
Instructions for adding additional domain authentication in SendGrid can be found here: https://docs.sendgrid.com/ui/account-and-settings/how-to-set-up-domain-authentication#setup-steps-required-for-both-automatic-and-manual-setup
Help prevent your emails being flagged as spam
Although EventsAir does allow you to send emails directly (usually via SendGrid), we don’t control what happens at the recipients’ end – that’s in the control of their email provider.
Major email providers are tightening up their guidelines and definitions of ‘spam’.
There are also other organizations that may choose to flag certain email domains as ‘spam’ and again, this is outside of EventsAir’s control.
Because email marketing is a key part of promoting your event, we want to help you stay up to date with security and authentication requirements of major platforms such as Gmail and Yahoo. This helps reduce the risk of having your emails being incorrectly flagged as spam, or not delivered. It also helps ensure other people using the same domain to send emails are not incorrectly flagged as spammers.
You should also be mindful of the laws and regulations relating to bulk messaging and data privacy – not just in your own region but in your recipients’ region(s).
All of this requires regular and proactive review and updating of your email sending practices. At a minimum, we recommend:
Meet Authentication Requirements:
Ensure your email sending domain is authenticated using SPF protocols. This helps email providers verify the legitimacy of your emails and reduces the likelihood of them being marked as spam. If we’ve contacted you to suggest making these changes, please do so quickly, and contact us if you’re unsure about what to do.
Review email content and subject lines:
When you send engaging and relevant content that gives helpful information, rather anything that sounds like a ‘hard sales pitch’, your emails are less likely to be flagged by a recipient as spam. You should ensure you’re familiar with rules on ‘account related’ emails (i.e. sending essential information about an existing business account or transaction, such as confirming registration details) versus marketing emails (where you’re selling or promoting a service to customers or potential customers).
Certain phrases and words may automatically trigger a spam filter. Avoid excessive punctuation (exclamation marks, all capitals) or words such as “FREE” in either the content or subject lines. For example: “FREE TICKETS!!!!!!” may be true, but also may be flagged as spam. If you need more information, we encourage you to research further and use the resources we’ve included below.
Include Unsubscribe links:
For any marketing and promotional emails, bulk senders MUST give the option of unsubscribing with just one click directly within their email campaigns. An unsubscribe link is automatically added to your email footer when you create a Marketing Merge Doc. Be cautious using Confirmation Merge Docs for marketing, and always check the “This is Marketing” box as this will create an unsubscribe link if there isn’t already one there.
Keep your mailing lists updated:
High bounce rates and low engagement can negatively impact your sender reputation and affect deliverability. Ideally, you should only email people who’ve opted in to receive your emails. Regularly clean up your email lists to remove inactive or invalid email addresses. NEVER purchase email lists or scrape email addresses from other sites. If your audience hasn’t heard from you recently, and aren’t expecting to hear from you, there’s a greater chance they’ll mark your email as spam.
Don’t send marketing emails to people who’ve opted out:
When sending a marketing email, checking the ‘This is Marketing’ box ensures that the email won’t be sent to people who’ve unsubscribed from marketing emails from this event*.
*Email unsubscribe lists in EventsAir are event-based, so if you want an individual to be able to unsubscribe across ALL events, you should either use a contact store OR manually unsubscribe them from each event where they may be listed.
HELPFUL RESOURCES:
→ 8+ Best Practices to Improve Your Email Deliverability:
https://sendgrid.com/en-us/blog/8-best-practices-to-improve-your-email-deliverability
→ 9 Reasons Why Your Emails Go to Spam:
https://kinsta.com/blog/why-are-my-emails-going-to-spam/
→ A Complete Guide to 2024 Email Deliverability Updates:
https://www.braze.com/resources/articles/guide-to-2024-email-deliverability-updates-what-to-expect-from-gmail-and-yahoo-mail
Need more help, or have taken all these steps and still having problems? Please lodge a support ticket.
Offices
Offices can be found under Application Setup, in System Setup.

The Offices setup is an optional function where you can define multiple locations and user types for each location.
This is very useful if you have teams in different locations, and you want to particular events or personnel to be assigned to particular offices, or multiple offices.
To set up Offices:
- Define your office locations in System Setup.
- Define your user types in User Setup. The three user types you can define are:
- Application Administrator
- Office Administrator
- User Role Assignment
- When setting up an event, you can nominate a specific Office.
- You can also choose to allow particular offices to have access to reports you've created in the Reporting panel.
Creating Offices
Enter the name of each office (where you have staff / from where you plan to manage events):
