The Functions module is where you set up and manage social gatherings and activities, when you want to...
- allocate seating or tickets (including for groups)
- limit numbers or set up waiting lists
- track attendance
- collect and report on dietary requirements
- issue invitations
- control access/ask for credentials
and/or - record A/V requirements
When setting up functions, you can also:
- create different categories for your functions (Function Groups), for example to help with communications and reporting.
- set up a variety of Fee Types for each function, for example to create different prices for different types of attendee.
- record the details of guests/partners who'll be attending the function, even if they haven't registered for the overall event.
Setting up the Functions module
The Preferences section of the Functions module is where you create measurement and color settings for Table Allocation. (The Table Allocation feature, in Express Actions, is explained further below in this article.)
Table Allocation Measurement System - choose either Metric or US measurement
You can also choose colors that will appear on the Table Allocation plan for:
- Available Seats
- Allocated Seats
- Blocked Seats
- Highlighted Seats

Payment and Cancellation policy tabs
Read more about setting up Payment and Cancellation policies.
You can create global Payment & Cancellation Policies, and Terms and Conditions (for all Functions); or you can override them and create specific ones for each function.
Function Groups
You need to create at least one Function Group before you can create a function.
Function Groups are a way of organizing different types of functions. For example, you could create Function Groups for:
- Inclusive Functions
- Optional Activities
- Tours and Programs
- Educational Classes
You can create as many different types of Function Groups as you like, and use them to search and filter, for example to run a report specifically on Optional Activities.
To create a Function Group:
- Click on the plus icon
 next to the words Function Group.
 - Give the function group a name, such as Breakout Meetings or Optional Activities.
If you only need one group, you can just call it "Functions". - Select Save.
Now you can start creating and managing specific functions within each group.
Add a function
To create a new function, click on the plus icon  to right of the word Function.
Creating a function - Details tab
- Name - this name will appear on registration sites, in apps etc.
- Function Group - select the Function Group (this is mandatory, which is why you need at least one Function Group).
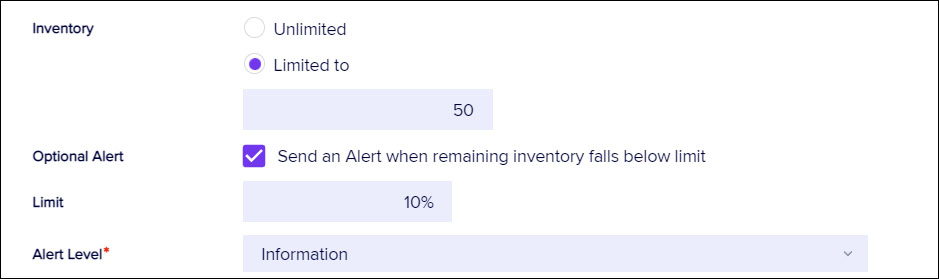
- Inventory - you can limit the number of guests for this function (e.g. for a limited seating event), by entering an inventory number here. When this number's been reached, attendees will either see a "Full" indicator when trying to book for this function online, or (if enabled) they can ask to be added to the waitlist.
Optional Alert - Inventory
When you set an inventory limit for a function, you'll have the option to create an alert, to be sent if the remaining inventory level falls below a certain percentage.For example, if you set a "Limit" percentage of 10% and your "Limited To" number is 50, you'll get the alert when there are fewer than 5 tickets remaining:
- Date - the date (based on event location).
- Start and End Time - the start and end times.
If you leave dates/times blank, your function may not appear as it should in other areas of EventsAir, such as the Organizer App.
- Overview - a broad description of the function.
- Details - more information if required.
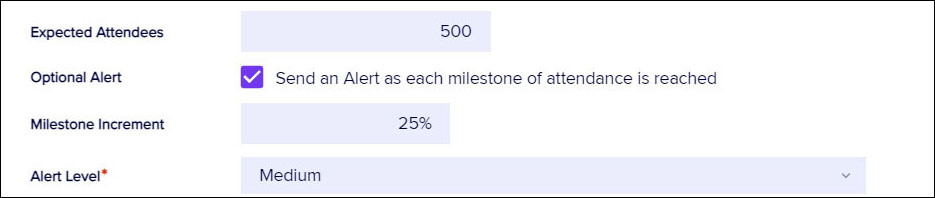
- Expected Attendees - an optional field where you can enter an estimate of attendance.
Optional Alert - Expected Attendees
When you set a number for Expected Attendees, you'll have the option to create milestone alerts, to be sent when function numbers reach certain percentage milestones.For example, if you set 25% as a milestone, an alert will be sent when function numbers reach 25%, 50%, 75% and 100% of your Expected Attendees estimate.
- Track - you can assign this function an Agenda track number from 1-99, or have the function span multiple Agenda tracks.
- Options
- Do not Publish to Attendee App
- Do not Publish to OnAIR
- Do not Publish to Event Websites and Portals
- Do not Publish in My Agenda
In Person Check-In settings
Function check-in with:Here, you have the option to enable beacon auto-check-in, QR code scanning, and/or scanning by the event organizer/onsite team.
In Person Check-Out settings
Function check-out with:
Again, you can enable beacon auto-check-in, QR code scanning, and/or scanning by the event organizer/onsite team.
Read more about check-in and check-out options.
- Location - you can choose from locations you've created (either further below in the Functions module, or in the Presentations module).
- Room Setup and Food & Beverage - add information here for your onsite team and caterers.
- Agenda Color / Background / Bold - set the styling options for how this function will appear when the Agenda is published online.
- Table Allocation Options - you can enable and manage how attendees choose table seating in the Attendee App. You can also track ticket collection (if attendees can pick up their tickets before the function).
See more information about table allocation below. - Guest Name Options - these options let you manage how guest names are collected in EventsAir.
See more information about guest names below. - Comment - any extra information.
Setting up a waiting list
There may be times when you want to allow people to put their name on a waitlist for a function, so that if there are cancellations or you increase the inventory, you can offer them a place at the function. Read more about setting up and managing waitlists.
Creating a function - other tabs
Extra options for each function:
- A/V tab - select specific A/V items for this specific function, choosing from your pre-defined list (you would have created this further below in the Functions module, or within the Presentations module), or manually adding items in the "Other Audio Visual Equipment Required" box.
- Sponsors tab - if you've enabled function sponsorships, you can assign a specific function sponsor here.
- Run Sheet tab - you can add specific tasks related to this function without needing to leave the Function setup.
- Itinerary tab - this free-form text field is for extra details you want to appear on an attendees' itinerary, such as transport, dress code etc.
- Payment Policy & Cancellation Policy tabs - these will only appear if you've checked the relevant boxes in in the "Payment and Cancellation Policy" section of the module. (See information earlier in this article.)
- OnAIR tab - this gives you options to make this a virtual or hybrid function (for example, so that remote attendees can watch a live-streamed awards presentation that your in-person attendees will see live on stage). To learn more, search for and review information on how to configure settings in OnAIR tab for Presentations (Sessions).
- Access Control tab - Checking the box to allow Access Control gives you further options to open up or restrict access to this function.
If you select either the "All Attendees" or "Target Group" options, you can also ask EventsAir to automatically add a booking for this function to the attendee's record, if they don't already have one. Choose a fee type and payment status for this option here to set up this feature. You can also create an "Access Denied" message here, which is useful if you have self check-in options enabled. - Advanced tab - - you can add an optional Unique Code here, but that's only used in the report editor or by your integrations team. Under the Advanced tab in Functions, you can also enable the following settings:
- Record individual function date and time during data entry - use this option to add extra fields to the attendee's contact record so you can specify dates and times for this attendee, for this function. [For example, you'd use this to manually allocate dates/times for specific attendees, if your 'function' spanned several days and you wanted to allocate time-slots within that.]
- Enable Golf Management - This option will let you specify:
- Cart or Caddie Details
- Shotgun or Tee Time Start information
If Golf Management is enabled for a function, the attendee record for anyone registered will include an extra "Golf Details" tab. Golf details can also be shown in reports.
Creating function fee type(s)
Once you create and save your new function, an "Add Fee Type" box will appear to the right of your function.
Tip: Every function must have at least one Fee Type. If you're not collecting fees for this function, just set up a Fee Type that has a 0.00 cost.
- To create one or more Fee Types for your function, follow these steps:
- Click on the Add Fee Type box.
- Enter the name of the new fee category, such as Member Ticket or Spouse Ticket.
- If you are setting inventory limitations for this fee type, you have three choices:
- Unlimited will allow for an unlimited amount of bookings under this fee category.
- Setting to Function Inventory will make fee categories available until the overall Function Inventory is reached.
- Limited will allow you to set a specific inventory for this fee category. For example, if you wish to sell ONLY 10 Spouse Tickets, you would select Limited and enter the number 10.
- You can also set an alert to be sent automatically if your function inventory falls below the percentage limit you set.
- When finished, select the Save button.
- You can create additional fee types as required.
- Valid Payment Status - the default payment statuses are Purchase, Inclusive, Complimentary, and Canceled.
Read more about payment statuses (and payment and cancellation) here.
You can also enable other payment statuses for each fee type, such as:- No Charge
- Own Expense
- Invited
- Not Attending
- Not Required
- Deposit
- Charge to Another Contact
- Split Charge
- Waitlist Purchase
- Waitlist No Payment Required
Functions - Guest Names
Although technically everyone who attends a function might be referred to as a 'guest', in this case, 'guest' means a partner, friend, or colleague of the main, registered attendee. They've been invited to the function by that main attendee, but it all depends on the type of function what happens next.
You may want to:
- simply allocate an extra place and not worry about recording a name
- record some basic details (for example, so they can receive a place card at their table)
- create/match guest contact records (so they'll be added into EventsAir just like an attendee record, but with the notation 'guest of'). Alternatively, the 'guest of' information for this function will be added to an existing attendee record if it matches, based on email, first name, and last name.
Depending on which of these you want, you'll choose different options when you set up a function, and when you add the function to your interactive (registration) site.
When creating a function
Scroll down until you see "Guest Names", and select either:
- Guest Names do not need to be recorded
This lets the attendee select a guest or spouse ticket to a function via a registration site, without needing to give any details about the guest.
- Record guest name, title and organization only
When an attendee selects a guest ticket to a function on a registration site, and you enable "Record Guest Names" on that function's fee type(s), extra fields will appear for the attendee to add their guest's details. [You nominate which details, possibly even including dietary preferences, when you configure the details for that function on your registration site.] Under this option, the guest's details will be added onto the main attendee's contact record. If you want to, you can also give attendees extra information about how this works or why you're asking for the information on your registration site.
- Create a new linked Contact Record
Again, in this case, if the option to record guest names is also enabled on the registration site for this function, the person registering will see fields for relevant information such as name, title, organization etc. However, unlike the previous option, in this case a new contact record for the guest will be created (and if you enable the option on the registration site function details tab, EventsAir will check for any existing matching contacts). - The primary attendee's contact record will show the purchased function items, and this will include the guest name details, payment information, table seating assignments and more. There'll also be a link to the actual guest contact record.
- The guest's contact record will contain their details and the function item noted as "Guest of". The payment status will be shown as "Guest of) with the name of the primary attendee as a hyperlink back to the main attendee's record. The main attendees' record will also have a "Guests" tab under Functions.
Collecting guest names on an interactive (registration) site
- Add the function and fee types to the site
- Expand the component for the function
- Open each function fee type you want this to apply to, and enable the Record Guest Names option
- In the Details tab for the function, check the box if you want to match guests to existing contacts. This will search for existing contact records using first name, last name and email address, and use that contact record if found, instead of creating a new one.
- Select which contact fields will be collected for guests - you can edit the field labels as well
- You can also check the box to allow guest names to be confirmed at a later date
- This is also where you set options for collecting dietary requirements information (for both attendees and their guests) for this function
Functions - Location & AV Settings
Location and AV options you create in one module will become visible in the other, and will also flow through to your Agenda and Run Sheet as needed. Search this help site for more on how to integrate your function and presentation room and AV requirements throughout EventsAir.
Add a location
- Click the plus icon to the right of Location.
- Name the new Location
- Add comments if needed (e.g. "The River Room is on the lower level of the hotel, next to Barkley's Cafe")
-
There's also a checkbox labeled: Enable this Location for EventStream Check In.
If you tick the checkbox, any Sessions or Functions using this location will display the "Check In" option in EventStream (this has to be enabled in Communications > EventStream Manager > Settings > Automated posts). - Select Save
Add an AV requirement
- Click the plus icon to the right of Audio Visual.
- Name the new AV requirement, e.g. "Laser Pointer"; "Lectern".
- Select Save
Functions - Discount codes
You can choose to allow discount codes for your functions. Read more about setting up discount codes.
Table Allocation
You can create custom table seating floorplans for gala events, dinners and any other type of seated function.
Once you've enabled Table Allocation features and created a floor plan, you can:
- Use the Function Table Allocation feature in Express Actions to assign specific people to particular tables/seats, and/or bulk assign people to tables, in numerical order or using the randomize feature.
- Let attendees choose their own seating via the Table Selection component in the Attendee App.
AND/OR - Use the Function Table Allocation App to help with last-minute seating arrangements.
Step 1 - Enable Table Allocation for your function
When setting up a function, under the Details tab you have the option to Enable Table Allocation.
When this is selected, you'll also see the three options below become available:

The options are:
- Track Ticket Collection - lets you manage the collection of tickets by attendees, using the Function Table Allocation App.
- Show in Attendee App - enable this to show the attendee their table number in the My Agenda component of the Attendee App.
- Allow Table Selection - this allows attendees to see, choose, and change their tables if the Table Selection component is included in the Attendee App.
Step 2 - Create a Table Plan
The Table Plan tab only appears in the Function setup when you've enabled Table Allocation in the Details tab (as explained above).
Use the tools below to create the correct seating configuration for your function.
-
Plan Grid - the main area for designing your table plan is in a grid pattern. This pattern (in feet or meters) can be zoomed in or out by using the scroll wheel on your mouse, or by using the magnification set window (in the lower-left corner of the grid).
-
Galleries - the column on the right shows common shapes you can drag and drop onto the Table Plan Grid. [One gallery shows common tables with seating, the other gallery shows other general standard shapes.]
|
|
Pointer – after using another tool, you can return to the pointer (selection tool) by clicking on this arrow. To select multiple items, hold down the CTRL key while selecting items; alternatively, SLOWLY click and drag across multiple objects and a box will appear to select all of them. |
|
|
Polygon – draw shapes (up to five-sided) |
|
|
Polyline – draw any number of lines to create any shape you need |
|
|
Select all – automatically select all objects (except background) |
|
|
Cut – cut the selected object and save it to the clipboard |
|
|
Copy – copy your selected object to the clipboard |
|
|
Paste – paste what's been cut/copied and is in the clipboard into the builder |
|
|
Clone – select one or more items and create exact copies of items and layout |
|
|
Delete – delete selected item(s) |
|
|
“Send to back” – this tool will place the selected image or item behind all other stacked (superimposed) items/images |
|
|
“Send backward” – moves a stacked image one layer back (behind another image) |
|
|
“Bring forward” – moves a stacked image one layer forward (in front of another image) |
|
|
“Bring to front” – brings one item to the very front |
|
|
Align left – lines up a group of selected items by their left-hand edge |
|
|
Center – lines up a group of selected items to their (horizontal) center |
|
|
Align right – lines up a group of selected images by their right-hand edge |
|
|
Align top – lines up a group of selected images to the top edge |
|
|
Align middle – lines up a group of selected images to their (vertical) center |
|
|
Align bottom – lines up a group of selected images to the bottom edge |
|
|
Tools – shows snap options (whether objects automatically line up with nearest gridline) |
|
|
Undo – reverses the previous action |
|
|
Redo – re-does the previous action |
|
|
Insert image – add an image into your plan (see more information below on how to make this a background image). |
|
|
Download image – you can download an image of the floor plan |
|
|
Download PDF – save and download a PDF of your floor plan |
|
|
Number vertically – will number all stands/tables from top to bottom |
|
|
Number horizontally – will number all stands/tables from left to right |
|
|
Autofit – will zoom in or out to make the plan fit your screen |


To help you create your plan, you can add an image to the background, such as a template or 'skeleton' outline of the area you're working in.
- Use the "Add Image" tool to upload an image (e.g. an outline of walls, windows, etc).
- Resize your image by dragging it by the corners and moving it to the correct placement.
- Make sure the zero point (horizontally and vertically) still lines up with the top left corner of your plan after this step.
- In the bottom right corner of the selected uploaded image, you'll see a cog icon. Select it to see the option to label the image and "Add as background".
- The background image won't be affected by other changes you make to the plan.
- To remove the background image, right-click anywhere in the plan and wait for "Clear Background" to appear in a text box, then click on it.
Step 3 - Allocate seats or let people select their own
You can allocate seats individually or in bulk using the Function Table Allocation Express Action - read more in this article.
You can also allocate an individual attendee's seat on their attendee record.
You can choose to add the Table Selection component to your Attendee App.
This lets your attendees see a list of tables, who's sitting at each table, and which tables are available to select.
Attendees can search for and invite other attendees to sit at their table.
If they're assigned to a table, they'll see their table number in "My Agenda" details for that function, and if Table Selection is enabled, they can also:
- Change Table - see the list of available tables and select one
- Remove my Table Allocation - select this to remove the current table selection
- View Table Guests - see all other attendees sitting at the table
- Invite Guest - see other attendees and where they're sitting - and if they're not yet allocated to a table, they can be invited to join a table. Invited guests can accept or decline the table invitation.

Step 4 - Help people find last-minute seats
You can use the Function Table Allocation App to manage last-minute seating requests, ticket collection, no-shows, seat changes, and more.