Setting up streaming services to integrate with OnAIR
OnAIR is designed to work with the AIRCast streaming service within EventsAir. However, you may also want to use different streaming and webinar platforms such as Zoom, Twilio, Vimeo and YouTube. You can even use a mix of services.
Using AIRCast as your streaming service
The built-in AIRCast streaming platform is a service is provided directly by EventsAir and OnAIR, is very affordable, and eliminates the need for separately licensed external services such as Zoom, Twilio and other platforms. You will still need to license a video storage service such as YouTube or Vimeo if you require this. AIRCast can be enabled for specific events by visiting Event Preferences in Settings and enabling AIRCast for the current event.
Once enabled, you can’t later disable AIRCast for that event, but you’re only charged for what’s been used, based on the lowest charge possible. At the end of each month, if you’ve used AIRCast, we use both pricing models tocalculate the lowest cost and you’re only charged that amount. Approximate costs for each of the pricing models are below, and the full current costs are detailed in this article.
- Pay-as-you-go – a few cents per minute per attendee
OR
- Day Passes – a Day Pass charge of less than a dollar for every attendee PLUS an hourly charge for AIRCast Studio and AIRCast Interpretation Studio usage (includes rehearsals).
NOTE: AIRCast also provides a Twilio account so when enabled, anything in your event that would normally use Twilio will no longer allow you to select a Twilio option (as AIRCast will take over for these).
Using external streaming services with OnAIR
There are many options, and you can use different platforms for different purposes. You may also need more than one platform. You’ll want to consider many aspects, such as: concurrent sessions, webinar license add-ins, number of participants, Internet speeds and more.
This article gives some information about setting up:
- Twilio
- Zoom
- Vimeo
- YouTube
- Vonage
IMPORTANT INFORMATION BELOW - PLEASE READ!
- The products described are external platforms.
- Companies may not alert the OnAIR team with any changes they make to their integrations and APIs.
- Costs may have been updated since they were last communicated to us, so please double-check with service providers and don’t rely on this document.
- We strongly recommend you test ALL connections and platforms well in advance.
- If you experience any issues with performance or operation, please contact EventsAir support as soon as possible.
- The images in this article may not appear exactly as they currently do in each platform.
Choosing appropriate external streaming services
- Webinar platforms such as Zoom are typically used to power your sessions, concurrent sessions and targeted sessions.
- Video platforms such as Vimeo or YouTube are used to store pre-recorded videos for playback in the OnAIR portal.
- Twilio is as platform used to power 2-person or small group interactions, such as video chat, exhibitor instant meetings, virtual networking and group functions, Live Support and Meeting Hub.
- Platforms such as Vimeo, Vonage or YouTube are used to host Live Streams of your sessions. These can be produced by professional AV teams or done yourself using Zoom to broadcast a live stream.
Other things to remember:
- Review your program size and format and choose what services best fit your program.
- You are responsible for obtaining your licenses for the services you wish to provide in OnAIR.
- You’ll need multiple licenses if you plan on offering concurrent sessions if you’re using external providers.
- Make sure your webinar licenses provide for the maximum number of participants you expect to host.
- Normally, external connections are set up one time and used for all virtual events you plan to produce.
Where do I set all this up?
- In EventsAir>Application Set Up, (visible only to application administrators), open the External Connections module, and click to add a Live Streaming Platform.
- There are details you need to fill in, such as API Key, you’ll obtain from the streaming platform itself (see the Zoom section below for an example).
- For specific set up instructions within EventsAir, you may also want to refer to other articles (for example, to set up a live stream of a Zoom Meetings Presentation via YouTube or Vimeo.)
Twilio
Twilio is free to set up and you pay as you use it (per participant, per minute). There are different charges based on “Small Group” or “Large Group” choices.
[Please note that if you’re using AIRCast for your event, it will take the place of Twilio for that event.]
This platform can be used for the following OnAIR features:
- Small webinar sessions up to 40 people plus presenters
- Poster Presentations up to 40 people plus presenters
- Networking Functions (up to 4 people per conversation)
- Group Functions up to 50 people per virtual table
- Exhibitor Instant Meetings (up to 4 people per conversation)
- Exhibitor Prescheduled meetings (up to 4 people per conversation)
- Meeting Hub (2 people)
- Live Support (2 people)
Connecting to Twilio - External Connection Details
- Navigate to https://www.twilio.com/
- Select Sign up to Start Building
- From there, you will be directed to your account console
- Navigate to your Account Console.
- You’ll see your Dashboard. Locate your Account SID. You’ll need this later.

- Click on Settings on the left side menu.
- Once there, select API Keys.
- Select New API Key.
- Enter a name that will easily identify this key, such as Twilio API for EventsAir.

- Select Create API Key.
- Your API Key (SID) and Secret Key will appear.

IMPORTANT NOTE: The secret key will ONLY show up once! It is recommended that you copy the SID and Secret Key as text into a secure place if you need it later (don’t take a screen shot otherwise you will need to retype this). You will need both the API Key and Secret Key to set up Twilio in EventsAir.
Setting up the external connection to Twilio in EventsAir
- From the Event Selection Panel, click on Application Setup.
- In Application Setup, select External Connections.
- Locate Live Streaming Platform.
- Enter your Name for this connection (eg Main Twilio Account).
- Select Meeting and Small Session (under 50 people).
- Ensure that Twilio is selected in the Platform field.
- Enter a Description if needed.
- Paste your Account SID, API Key and Secret Key into the appropriate fields.

Zoom
Zoom supports virtual sessions for larger audiences, such as plenary sessions. You’ll most likely be using Zoom for:
- Webinar sessions
- Interactive workshop sessions
What you choose will depend on your usage. To add Zoom to OnAIR, you need at least a Pro Zoom account, and to use it for webinars, a Zoom Webinar Add-in is necessary (with access for however many participants you'd like to attend).
IMPORTANT, PLEASE READ!
Zoom frequently makes changes to their integrations and API solutions. We're not always alerted to changes that may affect the instructions in this document.
Please test all your connections well in advance. If you experience any issues with performance or operation, please contact EventsAir Support as soon as possible.
To integrate Zoom into EventsAir, you will have to create two Zoom apps:
A Server-to-Server OAuth App (IMPORTANT - NOT the other OAuth App also in Zoom) and a Meeting SDK App.
The apps you need are created via the Zoom App Marketplace.
You must be signed into a Pro Zoom account or higher see the right options. Some options, such as specific scopes, may not be visible without the correct license. If you don't have a Pro level account yourself, consider creating the apps you need (described below) using your client's Zoom account if you have permission and access.
The credentials from these apps are put into EventsAir, which in turn generates a URL to use for your webinars.
Basic instructions on how to do this are below, however Zoom may also make further changes outside of our control. More information can be found here: https://developers.zoom.us/docs/zoom-apps/ and here: https://developers.zoom.us/docs/build-flow/ They also offer Premier Developer Support.
The steps below are given for your convenience. They may be subject to change.
_____
IN EVENTSAIR
In Application Setup > External Connections, and add a new Live Streaming Platform.
Give it a name, and choose "Large sessions (over 50 people)".
For the Platform, choose Zoom.
Doing the above will open up a number of other fields, and the information you need to fill them in will come from the Zoom apps you create.
You need to swap back and forth several times as information is validated between the two. The image below is a summary you can refer back to as you go through the process. Keep your EventsAir tab open while you're working in the Zoom tab and vice versa.

______
IN ZOOM
Sign into your Zoom account, and look for "Zoom App Marketplace" (under Advanced).
Look for the Develop dropdown (top right) and choose "Build Server-to-Server App". [This is the Server-to-Server OAuth App.]

Give the app a name, and select "Create".
The App Credentials will auto-populate. [You shouldn't need to, but you can come back to “App Credentials” later via the left-hand menu.]
Copy the Client ID and Client Secret and Account ID from this app. [The fields don't appear in this order in Zoom.] See the EventsAir image below for more guidance.
IMPORTANT: If you make changes to this app later, such as altering the Scopes, you'll need to come back here and select "Regenerate" for the Client Secret. This will be a new client secret, so you'll need to re-do the rest of the steps for setting up the app.
_____
IN EVENTSAIR
In the tab where you have EventsAir open, paste these details into the fields for Server-to-Server Client ID, Server-to-Server Client Secret, and Server-to-Server Account ID. [Again, noting they're not in the same order as they are in Zoom.]

Some of the setup fields in EventsAir will still be blank. You need to fill in the field that says "End Point Name" with whatever endpoint name you'd like to use (no spaces, no special characters). You'll also see an End Point URL appear, but we're not ready to use this yet.
Then SAVE.
Find the name of the Live Streaming Platform you just created, and select it again to open it up, ready for the next step.
______
IN ZOOM (Server-to-Server OAuth app)
App Credentials - this is where you should be. Select "Continue" to move to the next item (you can see where you are in the left-hand menu).
Basic Information - add Company Name and Developer Contact Information (i.e. your information).
Feature - Here you'll see the Secret Token. You need to copy this.
_____
IN EVENTSAIR
Paste the Secret Token into the correct field in your Live Stream Platform Setup (in EventsAir), and SAVE again.
You must save your Live Streaming Platform setup in EventsAir again (with Server-to-Server Client ID, Secret, Account ID and Secret Token) so that the URL is fully created. You'll then be able to validate it in Zoom in the next step. You may need to come back and do this again if you leave it too long to validate.
After saving, select the "Copy URL" button next to the End Point URL as you'll need it next.
______
IN ZOOM (Server-to-Server OAuth app)
Feature
Scroll down to see "General Features" and enable Event Subscriptions.
A notice will appear - select the button that says "+Add Event Subscription".
- Choose a name (optional)
- Leave Webhook selected (the default option)
- Paste the URL you just copied from EventsAir into the field that says: "Event notification endpoint URL".
- Then select the "Validate" button under "Validate URL".
Select +Add Events
- Under "Event Types", click "Meeting".
- Check the boxes for: Start Meeting and End Meeting.
- If you think you may want to change meeting details at some point, you can also select Meeting has been created, Meeting has been updated, and Meeting has been deleted.
- Now, under "Event Types", click "Webinar".
- Check similar boxes you did for Meeting (Start Webinar, End Webinar, and the other options if you wish: Webinar has been created/updated/deleted.
Select the "Done" button.
- You can leave “Event notification receiver” set to “all users”.
- Click Save, then Continue to the next section.
Scopes
- In the Scopes section for this app, you'll see some Scopes are already selected (under Meetings and Webinars). These are based on what you chose in the previous section. You also need to add more:
- Select "Add Scope", then use the search term (from the list of scopes below) to find the setting, then enable it with the checkbox. [Example below]
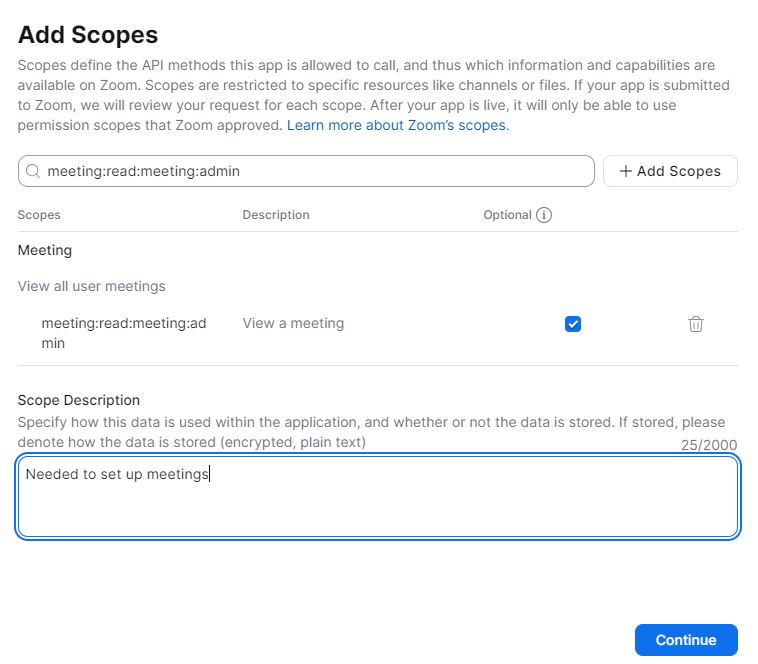
- You also MUST add a description in the Scopes section. This is a data management requirement (to say why you need access to this data), but your response can be very brief.

Group Scopes:
| Search term to use | What it does (will be shown in search result) |
|---|---|
| group:read:list_groups:admin | View groups |
Meeting Scopes:
| Search term to use | What it does (will be shown in search result) |
|---|---|
| meeting:read:meeting:admin | View a meeting |
| meeting:read:participant:admin | View a meeting's participant |
| meeting:update:meeting:admin | Update a meeting |
| meeting:write:meeting:admin | Create a meeting for a user |
User Scopes:
| Search term to use | What it does (will be shown in search result) |
|---|---|
| user:read:list_users:admin | View users |
| user:read:user:admin | View a user |
Webinar Scopes:
| Search term to use | What it does (will be shown in search result) |
|---|---|
| webinar:read:list_panelists:admin | View a webinar's panelists |
| webinar:read:participant:admin | View a webinar's participant |
| webinar:read:webinar:admin | View a webinar |
| webinar:update:webinar:admin | Update a webinar |
| webinar:delete:panelist:admin | Remove a webinar's panelist |
| webinar:write:panelist:admin | Add panelists to a webinar |
| webinar:write:webinar:admin | Create a webinar for a user |
| webinar:delete:webinar:admin | Delete a webinar |
After adding these Scopes, add a description, click Save, then Continue to the next section.
Activation
- If any items are missing from the previous steps, you'll see these highlighted in orange. Fill in any missing information and try again.
- When you see "You app is ready for activation", select the "Activate Your App" button.
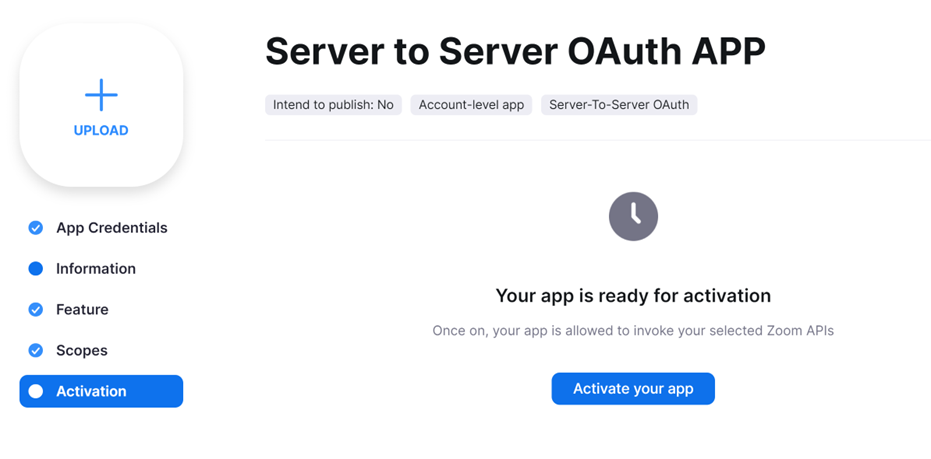
- You'll get a message saying “Your app is activated on the account”.

___
STILL IN ZOOM (you need to create the other app)
From the "Develop" dropdown (top right), select "Build App".

This will create the Meeting SDK app. A generic name such as "General app 123" will be automatically allocated. You can edit this if needed.

App Credentials will auto-populate, and these will appear in the top left - however you need to immediately change the top tab from "Development" to "Production" to get the correct App Credentials.

Basic Information
You can leave the default "User-managed" button selected.
Check again that you're collecting the Production App Credentials, then copy the Client ID and Client Secret from this app.
NOTE: If you make changes to this app later, such as altering the Scopes, you'll need to come back here and select "Regenerate" for the Client Secret. This will be a new client secret, so you'll need to re-do the rest of the steps for setting up the app.
_____
IN EVENTSAIR
Paste the Meeting SDK Client ID and Meeting SDK Client Secret into the correct fields.

SAVE AGAIN, then copy the Endpoint URL once more.
___
IN ZOOM (Meeting SDK app)
Still in Basic Information, paste the URL into the field for OAuth Redirect URL.
After a few seconds, it will also appear in the field for OAuth Allow Lists.
You can leave the other settings as they are, and select "Continue".
Access (Meeting SDK app)
- You don’t have to do anything with this Secret Token or Verification Token.
- Switch off Event Subscriptions (if it's on).
- Select "Continue".
Surface (Meeting SDK app) - you can skip this (select Continue).
Embed (Meeting SDK app)
- You must switch on (enable) "Meeting SDK" here.

- Once you do this, you'll see many other options, under "Use Device OAuth". You don't need to use these - the features are for people who want to sell their app publicly.
- You can leave the other options on this page blank and choose "Continue".
Scopes (Meeting SDK app)
- The minimum Scopes settings for the Meeting SDK App are listed below.
- Select "Add Scope", then use the search term (from the list below) to find the setting, then enable it with the checkbox.
- Again, you also MUST add a description in the Scopes section. This is a data management requirement (to say why you need access to this data), but your response can be very brief.
Meetings Scopes:
| Search term to use | What it does (will be shown in search result) |
|---|---|
| meeting:write:meeting | Create a meeting for a user |
| meeting:delete:meeting | Delete a meeting |
| meeting:update:meeting | Update a meeting |
User Scope:
| Search term to use | What it does (will be shown in search result) |
|---|---|
| user:read:zak | View a user's Zoom Access Key |
Webinar Scopes:
| Search term to use | What it does (will be shown in search result) |
|---|---|
| webinar:write:webinar | Create a webinar for a user |
| webinar:delete:webinar | Delete a webinar |
| webinar:update:webinar | Update a webinar |
| webinar:write:panelist | Add panelists to a webinar |
| webinar:read:list_panelists | View a webinar's panelists |
| webinar:delete:panelist | Remove a webinar's panelist |
App Listing (Meeting SDK app)
You must add a company name and developer contact, even if you only plan to use your app in Beta mode.
Zoom may also demand you add other details here - if so, you'll see a notice in the next section about what's missing and some of the fields here will be marked as mandatory.
In general, though, all the other details here (and in the following tab, Technical Design) are only relevant if you plan to make your app publicly available.
Add Your App (Beta Test) (Meeting SDK app)
If you still need to fill out more details, there'll be a notice under the heading about what you need to fix.
If everything's been filled out correctly, you'll see the option to Beta Test as "Local Only" (this will appear in the left-hand column).

The "Share App" section will show an Authorization URL, and it will say "Share within your account - Active" underneath.
You don't need to do anything with this URL, but it's used in the back end by both Zoom and EventsAir, so if you make changes to this app later, such as changing the Scopes, you'll need to regenerate it at this point (using the Regenerate button).
Vimeo
Vimeo is a platform that supports high-definition video.
There are different packages you can use with Vimeo, and the only significant requirement is that if you plan to offer Live Streaming of sessions within OnAIR, you will need the Premium account.
Otherwise, the lower accounts are fine (Plus, Pro or Business) and it depends on how much storage of pre-recorded videos you might need. You can always start at a lower package and upgrade any time you wish if your requirements change.
Locating Your Vimeo Video ID
If you are simply uploading videos to Vimeo to play back in the OnAIR Portal, you simply need to upload your video and locate the video ID.
This can be found in the URL for the video, or located in the video link details. Please note you only need the numbers, as shown here in red:
Creating a Vimeo Live Stream
NOTE: In your session set-up, if you choose Vimeo, you have the option to set up a one-time stream or a recurring one. Getting this wrong can cause a broadcast to not work correctly. We VERY strongly recommend only using the recurring stream setting for Vimeo. This allows you to stream multiple sessions without having to set up a new Vimeo stream every time. However, even if you are only streaming one session, we still recommend using ‘recurring’, in case you have any kind of connection failure during the stream (because that would register as the end of the session, and you can’t return to it).
To use Vimeo, you will need to create a live event. Please follow these steps to obtain the information you need:
- Navigate to Manage Videos in Vimeo and select Live Events
- Click Create Live Event.

- Enter an Event Title for your Live Event and select a Privacy preference.
Note: We recommend selecting Hide from Vimeo as this will aid in restricting access to just the OnAIR Virtual Event Portal. Click Next.

- Note down the Video ID from the URL in the Link field, i.e. https://vimeo.com/123456789, you will need this later in EventsAir.
- Select Specific Domains in the Embed Privacy dropdown and then enter the following URL substituting ‘alias’ for your EventsAir alias: alias.EventsAir.com.
NOTE: This feature is designed to prevent unauthorized sharing, but it it’s only supported for Vimeo within the OnAIR portal. Although it’s rare, attendees sometimes want to watch a video stream via the Attendee App. In this case, just provide the direct link to Vimeo.
- Click on the plus symbol to add the domain. Click Next to continue.

Change over to the Connect (RTMP) tab.
Note: Write down the RTMP URL and Stream Key and keep them in a safe place, you will need to provide both to your AV professional.
- Once Vimeo receives a stable stream from your Software or Hardware Encoder it will appear.


YouTube
YouTube is a video-sharing platform.
To use YouTube with OnAIR you must create and verify a YouTube account (this will be part of your Google Account).
Verifying your YouTube account
Follow these steps to verify your YouTube account:
- Open your YouTube page.
- Click on the Hamburger Menu top left corner.
- Click on the Help option.
- Scroll down and select the Verify your YouTube account help topic.
- Click on the verify your channel link in the first sentence.
- Follow the instructions provided by YouTube.
Locating Your YouTube Video ID
If you are simply uploading videos to YouTube to play back in the OnAIR Portal, you simply need to upload your video and locate the video ID.
This can be found in the URL for the video, or located in the video link details. Please note you only need the numbers, as shown here in red:
https://youtu.be/aBcDEf12345).
Locate your YouTube External Connection details
To use YouTube, you will need to create a new stream. Please follow these steps to obtain the information you need:
- Navigate to YouTube Studio (click on your logo/photo as if you were about to sign out, and you will find YouTube Studio in the dropdown).

- Click on Create then Go Live. This will launch the YouTube Studio Live Streaming Console.

- Click on Stream to create a New Stream.
Note: This is where you will provide the stream’s Name, Description and Category as well as its availability and timing. We recommend making the stream Unlisted as this will not publicly list the stream on YouTube and will require viewers to access via the OnAIR Portal only.
- You will need to declare if the stream is made for children (please note, this is NOT a setting to say your content is g-rated - it is only to be used if your content is specifically designed for children).
- Finally, there is an option to restrict your viewers to exclude those under the age of 18. You will need to leave this option disabled for the stream to be viewable in the OnAIR Portal.

- When you are ready select Create Stream to continue and this will launch the created stream’s Dashboard.

- Once the Dashboard has loaded, select the Select Stream Key dropdown and select Create New Stream Key.
- Enter a Name and Description.
Note: We recommend giving it the same name as the stream or naming it the location that the Encoder will be used as depending on your requirements you may be managing multiple Stream Keys.
For the Maximum Sustained Bitrate that you can support select 3000 Kbps – 6000 Kbps (1080p). This option is explained in greater detail below. Optionally you can Enable 60 fps for a smoother viewing experience.

- After you have created the Stream Key ensure it is the selected option.
- Next, we recommend you note down the Stream Key (hidden), Stream URL and Backup Server URL. You will need to enter these values into your Software or Hardware Encoder.
- To ensure an optimal OnAIR experience for your attendees, we recommend enabling the Ultra Low-Latency profile.
Note: Testing by EventsAir in April 2020 indicated this will result in an approximate 10-12 second delay. However please note broadcasting in 4K and 1440p resolutions and Closed Captioning are not supported by this profile.

- Select the Share button in the upper right corner of the screen.
Note: This will give you options to share your Broadcast with via other platforms as well as give you the dedicate YouTube link (i.e. https://youtu.be/aBcDEf12345).
- Select and copy the latter part of the link (i.e. aBcDEf12345), this is the stream’s Video ID which is required in EventsAir.

Vonage
Vonage is a video sharing and streaming platform used by programmers to drive custom video experiences. There are various pricing models, based on usage.
Creating your Vonage Account
- Login into Vonage at this URL: https://www.vonage.com.au/communications-apis/video/
- Select “Try it Free” to register.
- Once registered, select “Create Project” (this is under the Account Overview tab on the left). The following screen appears.
- Select Create Custom Project.
- Add a Project Name EG EventsAir and ensure VP8 is selected as preferred codec:
- Copy the two keys that are displayed.

- In EventsAir, navigate to Application Setup and select External Connections.
- Create a new External Connection and select Vonage.
- Paste the two keys and add to your new external connection
- This external connection can now be selected in the OnAIR portal setup
NOTE: If you've enabled AIRCast, you won't see the options to choose a different live streaming platform for your OnAIR portal.
