This article is about your event website - your promotional website. An event website is not interactive - if you're looking for information about creating a registration site, for your attendees, presenters, exhibitors etc to add details and pay online, please see the articles about interactive (registration) sites.
Also, although there are some similarities, features described in this article ONLY apply to event websites created with the event website builder, not the event info site portal.
A great promotional website helps you showcase your event to potential attendees (and exhibitors and sponsors, if required).
You can employ a web developer or use a template, or use the EventsAir website builder tool to create a beautiful event website within minutes, adding components such as Agenda, Speakers, Sponsors and Exhibition information, all of which will automatically update if any details change.
Building an Event Website - workflow
PREPARE
- Planning out the structure of your event website in advance is important.
- Mapping out your site beforehand (how many pages or sections), having your content written and approved and images and video resized beforehand will make the building process faster, but you can also edit elements later - even after you publish your site, if necessary.
- Read more about resizing images here.
CREATE YOUR SITE
- You can only have one Event Website (created with the HTML builder tool) per event, although it can link to multiple registration sites.
- [You can also create other information websites using the Event Info Site App if needed, but you'll need to edit the HTML directly as there's no editing tool.]
- The Event Website Builder tool first asks you to choose Single Page or Multi Page format ['Design Style'].
Once you choose a format, you can't change it later. The only option is to remove the site and create a new one.
REVIEW OTHER SETTINGS
- Under Design, you can set and edit extra design elements, including Brand, Navigation Bar colors and your website Header & Footer.
- Under the Advanced tab, you can add extra code*, and enable advanced settings such as including presenting co-authors and allowing people to search the agenda.
- The Custom Domain tab tells you how to give your site a custom URL (this costs extra and you also need to purchase a custom domain for the event).
BUILD
- The Event Website Builder Tool allows you to quickly drag and drop in elements and add sections of pre-formatted content. First add a section using the + symbol, then drag content blocks into your sections. You can also view the HTML code for the whole page.
CREATE A SAFETY NET WITH RESTORE POINTS
You should frequently create 'restore points' so that you can revert to a previous version of your site if you need to.
EDIT AND FORMAT
- You can edit and format text, images, video and tables, change text font and color, background colors, image transparency, block placement, and more.
SAVE AND PREVIEW
- When you want to see how your site looks, before publishing it live, you can use the "Save and Preview" button.
- You can enable "Draft" for each page on an event website, which means the page won't appear in either preview or published sites until you disable "Draft".
TEST
- Before going live with your site, you should check and proofread all the content, test all links, and ensure page URLs and the site menu appear as you want them to.
SAVE AND PUBLISH
- When ready, use the Save and Publish button to make your event website live. If you need to make changes, you can return to edit the site and use the Save and Publish button again to overwrite the previous version.
Creating a new event website
- Go to the Online Panel
- For EVENT WEBSITE, select New


- What you enter into the "Name" field will become part of your website's URL (unless you have a Custom Domain). The basic format of the site URL is: https://[your organization].eventsair.com/the-words-you-put-in-the-name-field
- You need to select a Brand (if you haven't already, create this in the Setup panel, under System Setup - Brand). This mainly affects what the website favicon will be (the small icon that appears next to the URL in the browser).
- You can clone from any another event website within your organization's instance of EventsAir. (If you want cloned information to pull through to the site, such as the Agenda, those modules would also need to be cloned.)
- Choose the Design Style: Multi Page or Single Page.
- Select the "Create" button (this doesn't publish your website, it just opens the builder tool).
Review Design settings
Before you build your website, check the Design tab for your site details including the Name.

- You can edit the Name field later but it won't change the URL if you've already published the site.
- You can also return here later to see the last published date, and to copy the site URL if needed.
Navigation bar settings:
- Format your website's navigation bar by choosing a default font and color, and background color.
- You can fix your navigation bar to the top of the site, or have it 'float' and stay visible as you scroll down the page.
- You can also set alignment, position and transparency for your navigation bar.

Designing a Header and Footer
Creating a header and footer for your site is optional. (On a multi-page website, this content will appear as a header/footer on every page, unless you choose to hide it.)
The process for creating and editing your header and footer designs is the same as for other content blocks.

Review the Advanced tab (whole site)
Each page/block also has an Advanced options tab, but this one is for the whole event website.

On this tab, advanced users can add in extra HTML code to override the default settings. There are fields for Pre </HEAD> Code; code to include in the <BODY> Tag; Post <BODY> Tag Code and Pre </BODY> Tag Code.
Caution: this may create unforeseen issues with your website so you should be aware that this may incur extra development costs at a later date.
"EventsAir Component" Settings
Before building your event website, if you plan to use "EventsAir" content blocks that dynamically update, such as the Agenda, Exhibition information or Sponsorship Packages, you should review the following:
- Presentation Statuses (affects Presenters module, if you're using this - doesn't affect Agenda)
- Include Keywords and Agenda Search (affects Agenda)
- Stand Types
- Sponsorship Packages
You'll also need to ensure you've set up the necessary modules correctly (for example, that your Presentation Status options have been created in Setup - Presentations). Correct settings here help ensure that all required information will be included on your event website in the Presenters module.
An example of how the settings might look (with nothing enabled) is below. This will vary depending on your event setup.

Review the Custom Domain information
You can purchase a custom domain name along with a SSL Certificate and apply that domain and certificate to this website. There are costs associated with this. If you need more information about Custom Domains, please review the FAQs on our Support Portal, or talk to your account manager.
Building your event website
The builder used to create an event website uses drag-and-drop features, but it's different to the one used for merge docs, interactive (registration) sites, and Attendee Apps & Organizer Apps.
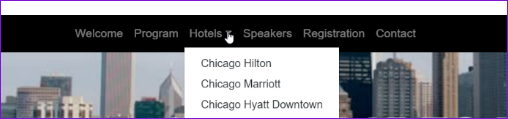
Navigation Menu - multi-page
- A multi-page event website is made up of pages (and possibly sub-pages). A site visitor uses the navigation menu to jump from one page to another, or reach sub-pages via a drop-down menu.

Navigation Menu - single page
- A single page event website will have sections and a site visitor can either scroll up and down to see the section they want, or use the navigation menu to jump to that menu block.

Your site's navigation menu is automatically created as you build your event website and name each new page (or sub-page) OR each new menu block.
Multi-page (add new page/sub-page)
For a multi-page site, you can create new Pages and new Sub-Pages:

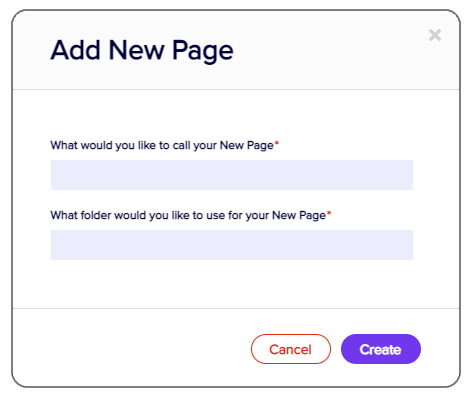
- Drag across the "Add New Page" from the left hand side to the right.
- Enter the name. This is the default text for your navigation link at the top of the page (but you change this later in the Advanced tab for the page). A folder will also be created in AirDrive for any associated images or videos.
- Click Create.

The process to add a sub-page to an existing page is much the same, however you first need to use the down arrow to expand the menu. Then drag "Add New Sub-Page" across.

Single page (add new block)
For a single-page site, you'll create new Menu blocks:

- Drag across the "Add New Menu Block" from the left hand side to the right.
- Enter the name (will also appear for your navigation link at the top of the page, but you change this later in the Advanced tab for the block).
- Click Create

Adding content to each page or block
For each Page, Sub-Page or Menu Block, add at least one section. Then within each section, you can drop in as many content elements as you need.
Click the setup cog icon on the page or block
to access the HTML builder .
.
You'll see the empty builder with three symbols:
|
|
Adds a new section. |
|
|
Adds a content element |
|
|
Shows the HTML for the page |


Adding sections
Use the + symbol to add a new section:

Choose the default format of your new section. You can almost any Content Elements within this section.
Under "Simple Start", your options are BASIC, SLIDER, VIDEO, or CUSTOM.
Custom elements include custom HTML code such as animated elements and are designed for advanced users.
Under "Quick Start", your options are HEADER, PHOTOS, PROFILE and MORE. (The builder defaults to Quick Start - Header when opened.)

Adding content elements to event website sections
After you've added a section, select the page symbol: 

This will show you all the available content block options. There are hundreds of content elements, but you can filter for just those you need (the list includes elements such as titles, team profiles, buttons, maps, contact information and more).

The EventsAir filter will display the content elements for:
- Agenda
- Tabbed Agenda
- Presenters
- Exhibitors
- Sponsors
- A countdown timer

Drag and drop a content element into the current section.
A grey bar appears to show you where your new content element will be placed.


EventsAir elements will dynamically update when changes are made. You also have the option to tweak this. For example, to hide some sessions from the published Agenda, tick the box that says "Do not publish to Event Website and Portals" in the session settings.
Setting restore points
As you work in the HTML builder, you may want to create a Restore point after making significant updates to your website. Tick the box to say "Create Restore Point on Save", and when you update and save, your current design and content will be stored along with the date and time.

Use the "Restore Previous Version" button at the bottom left of the HTML editor if you need to revert to your restore point.

Creating a new restore point will overwrite the previous one.
Content editing and formatting - event website
Select text or image elements on your page to see the icons and options listed below.
 |
Settings
If you've selected a section, Section Settings lets you move the entire section, change the height, and alter the scroll icon. If you've selected a box, Box Settings lets you change the background, alignment, transparency, width, position, and image settings for the box. |
 |
Video settings - (will only be visible on video content elements) Lets you insert a URL for either a background or poster video (you can upload a video to AirDrive and copy the link). You may need to reduce the video file size/resolution before uploading. |
|
|
Move - Moves the content block up or down (within the section) . |
|
|
HTML - Lets you see and edit the HTML code for this content block. |
|
|
Duplicate - Copies the current block. |
|
|
Delete - Removes the block. [CTRL+Z immediately after deleting should restore the block.] |
|
|
Change Image - Lets you choose a different image. |
|
|
Edit or insert hyperlink - add or edit the URL this image or text points to. |
 |
Hyperlink EDIT - [Only appears on a button] Edit the hyperlink for a button.
|


Using the Format Toolbar in your event website
Highlight any text block to have the format toolbar appear. Select the text you want to edit, then one of the options below:
|
|
Bold. Add or remove bolding. |
|
|
Italic. Add or remove italics. |
|
|
Formatting. Add or remove underlining, strikethroughs, superscript, subscript and uppercase formatting. |
|
|
Text Settings. Adjust font size, letter spacing and line height, or clear most formatting using the eraser icon. |
|
|
Color. Select text color either from a grid or by entering RGB values. You can also change the background/highlight and block background colors. |
|
|
Font. Select or change the font. |
|
|
Paragraph Format. Choose the heading style (level) or paragraph style. |
|
|
Alignment. Select left, center, right or justified. |
|
|
List. Indent, outdent, insert a bulleted list or insert a numbered list. |
|
|
Insert Table. Add a table. |
|
|
Insert Image. Insert an image (by uploading a file or using the image's URL) |
|
|
Insert Link. Highlight text to insert a hyperlink. |
|
|
Remove Link. Breaks an existing hyperlink you've highlighted. |
|
|
Icon Tool. Insert an icon from a default selection. |
|
|
Insert Element Tool. Selecting this will let you select a button or element and inserted at the selected point in your text. |
|
|
Clean Tool. Select any formatted text and then press this button to remove all formatting from the text. |


If a Settings box or toolbar is in the wrong place, hover over the top left until you see the handles/move icon so you can drag it out of the way.

Advanced Options - event website pages & sub-pages
For each page or sub-page on the event website, next to the HTML Builder tab is an Advanced tab.
Under Page Details:
- You can change the page title (note the folder in AirDrive and the navigation name will default to match the page title, but you can also specify something different).
For Search Engine Information:
- You can add keywords and a description here to improve SEO.
For Settings:
- You can mark this page or sub-page as Draft Only
- Hide the Header, Footer and/or Navigation bar from this page
- Remove this page from the navigation menu (i.e. make it a 'hidden page' - still public but not easily found)

Advanced users can also add in extra HTML code to override the default page settings.
Advanced Options - Blocks (single page event websites)
On the Advanced tab for each block you can change the name of the block (which also changes how it appears in the navigation menu) and select "Draft Only" if you wish.
Setting a page or block as "Draft only" means it won't appear on a live event website while you're editing it. You'll only see it in either Previewed or Published versions of the event website when "Draft only" is unticked. This is useful if you're editing multiple pages and only want some to be published.
Previewing and testing
Click on Save and Preview to save your work and preview the event website in your default browser.
- Ideally, you should also check how the site appears on other devices and in other browsers.
- Check that links work and images, text and videos appear as they should.
- Thoroughly proofread and double-check all dates, details and spellings.
Publishing your event website
Click Save and Publish to save your work and publish your event website for public viewing.
Once your event website has been published, you cannot unpublish it.
However you can delete the current content and overwrite that with, for example, one page that says "This website is now closed."