With EventsAir's group management tools, you can:
- Assign group contacts
- Sell accommodation, registration or function inventory to group contacts, for distribution later to group members
- Register groups for events or meetings in a single online process OR on an ongoing basis, through a dedicated group management portal
- Manage group accommodations in a dedicated portal for group housing management
What group management tools are available?
Your group management processes will depend on the type of event and type of group. Another variable may be that the number of group members and their names haven't yet been finalized before you need to begin setting up. Helpful tools you can use include:
- Attendees Panel Linking – this is where you can assign a specific attendee to be the "Group Contact" (coordinator), and add other people to a group.
- Group Inventory - Once you've linked attendees into a group, and created a "Group Contact" (coordinator), the Group Contact can purchase or obtain registrations, functions, travel and accommodations that are held as their "group inventory." These Group Inventory items can then be assigned or allocated at a later time as group members are added or registered. If you know who the group members are, and their items are purchased on a registration site, group members' payable amounts are given the payment status "Charge to another contact" (i.e. charged to the Group Contact.) ALTERNATIVELY you can set up group inventory and manually allocate items from it using the methods described in this article.
- Online Group Registration – You can create dedicated group registration sites so a group coordinator (attending or not attending) can register their group members online in one coordinated process. They can either pay for the whole group, or have each group member pay for themselves.
APPS AND PORTALS: - Group Registration App – This specialized app lets group coordinators import individual members of a group, send out links for individuals to register, and process payments either as a group or individually. This app is ideal if the size of the group may change, because the group coordinators can easily add new group members and individually register or send links to register and pay.
- Group Accommodation Portal – This portal is for group housing management, allowing group coordinators to see and manage their group, add or delete group members, and assign accommodation as needed. Coordinators are able to easily stay on top of their housing block (in one or more hotels). Once groups are defined and accommodations assigned, the event organizer can select these group attendees and email them a link to complete their meeting or event registration if this hasn't yet occurred.
- Group Allocation Portal - Combines features from the Group Registration App and Group Accommodation Portal and also allows management of group Functions and Travel.
REPORTING:
Group Reporting – You can search and filter specifically on a group by name, coordinator or group members for detailed reporting.
Attendee panel - group linking
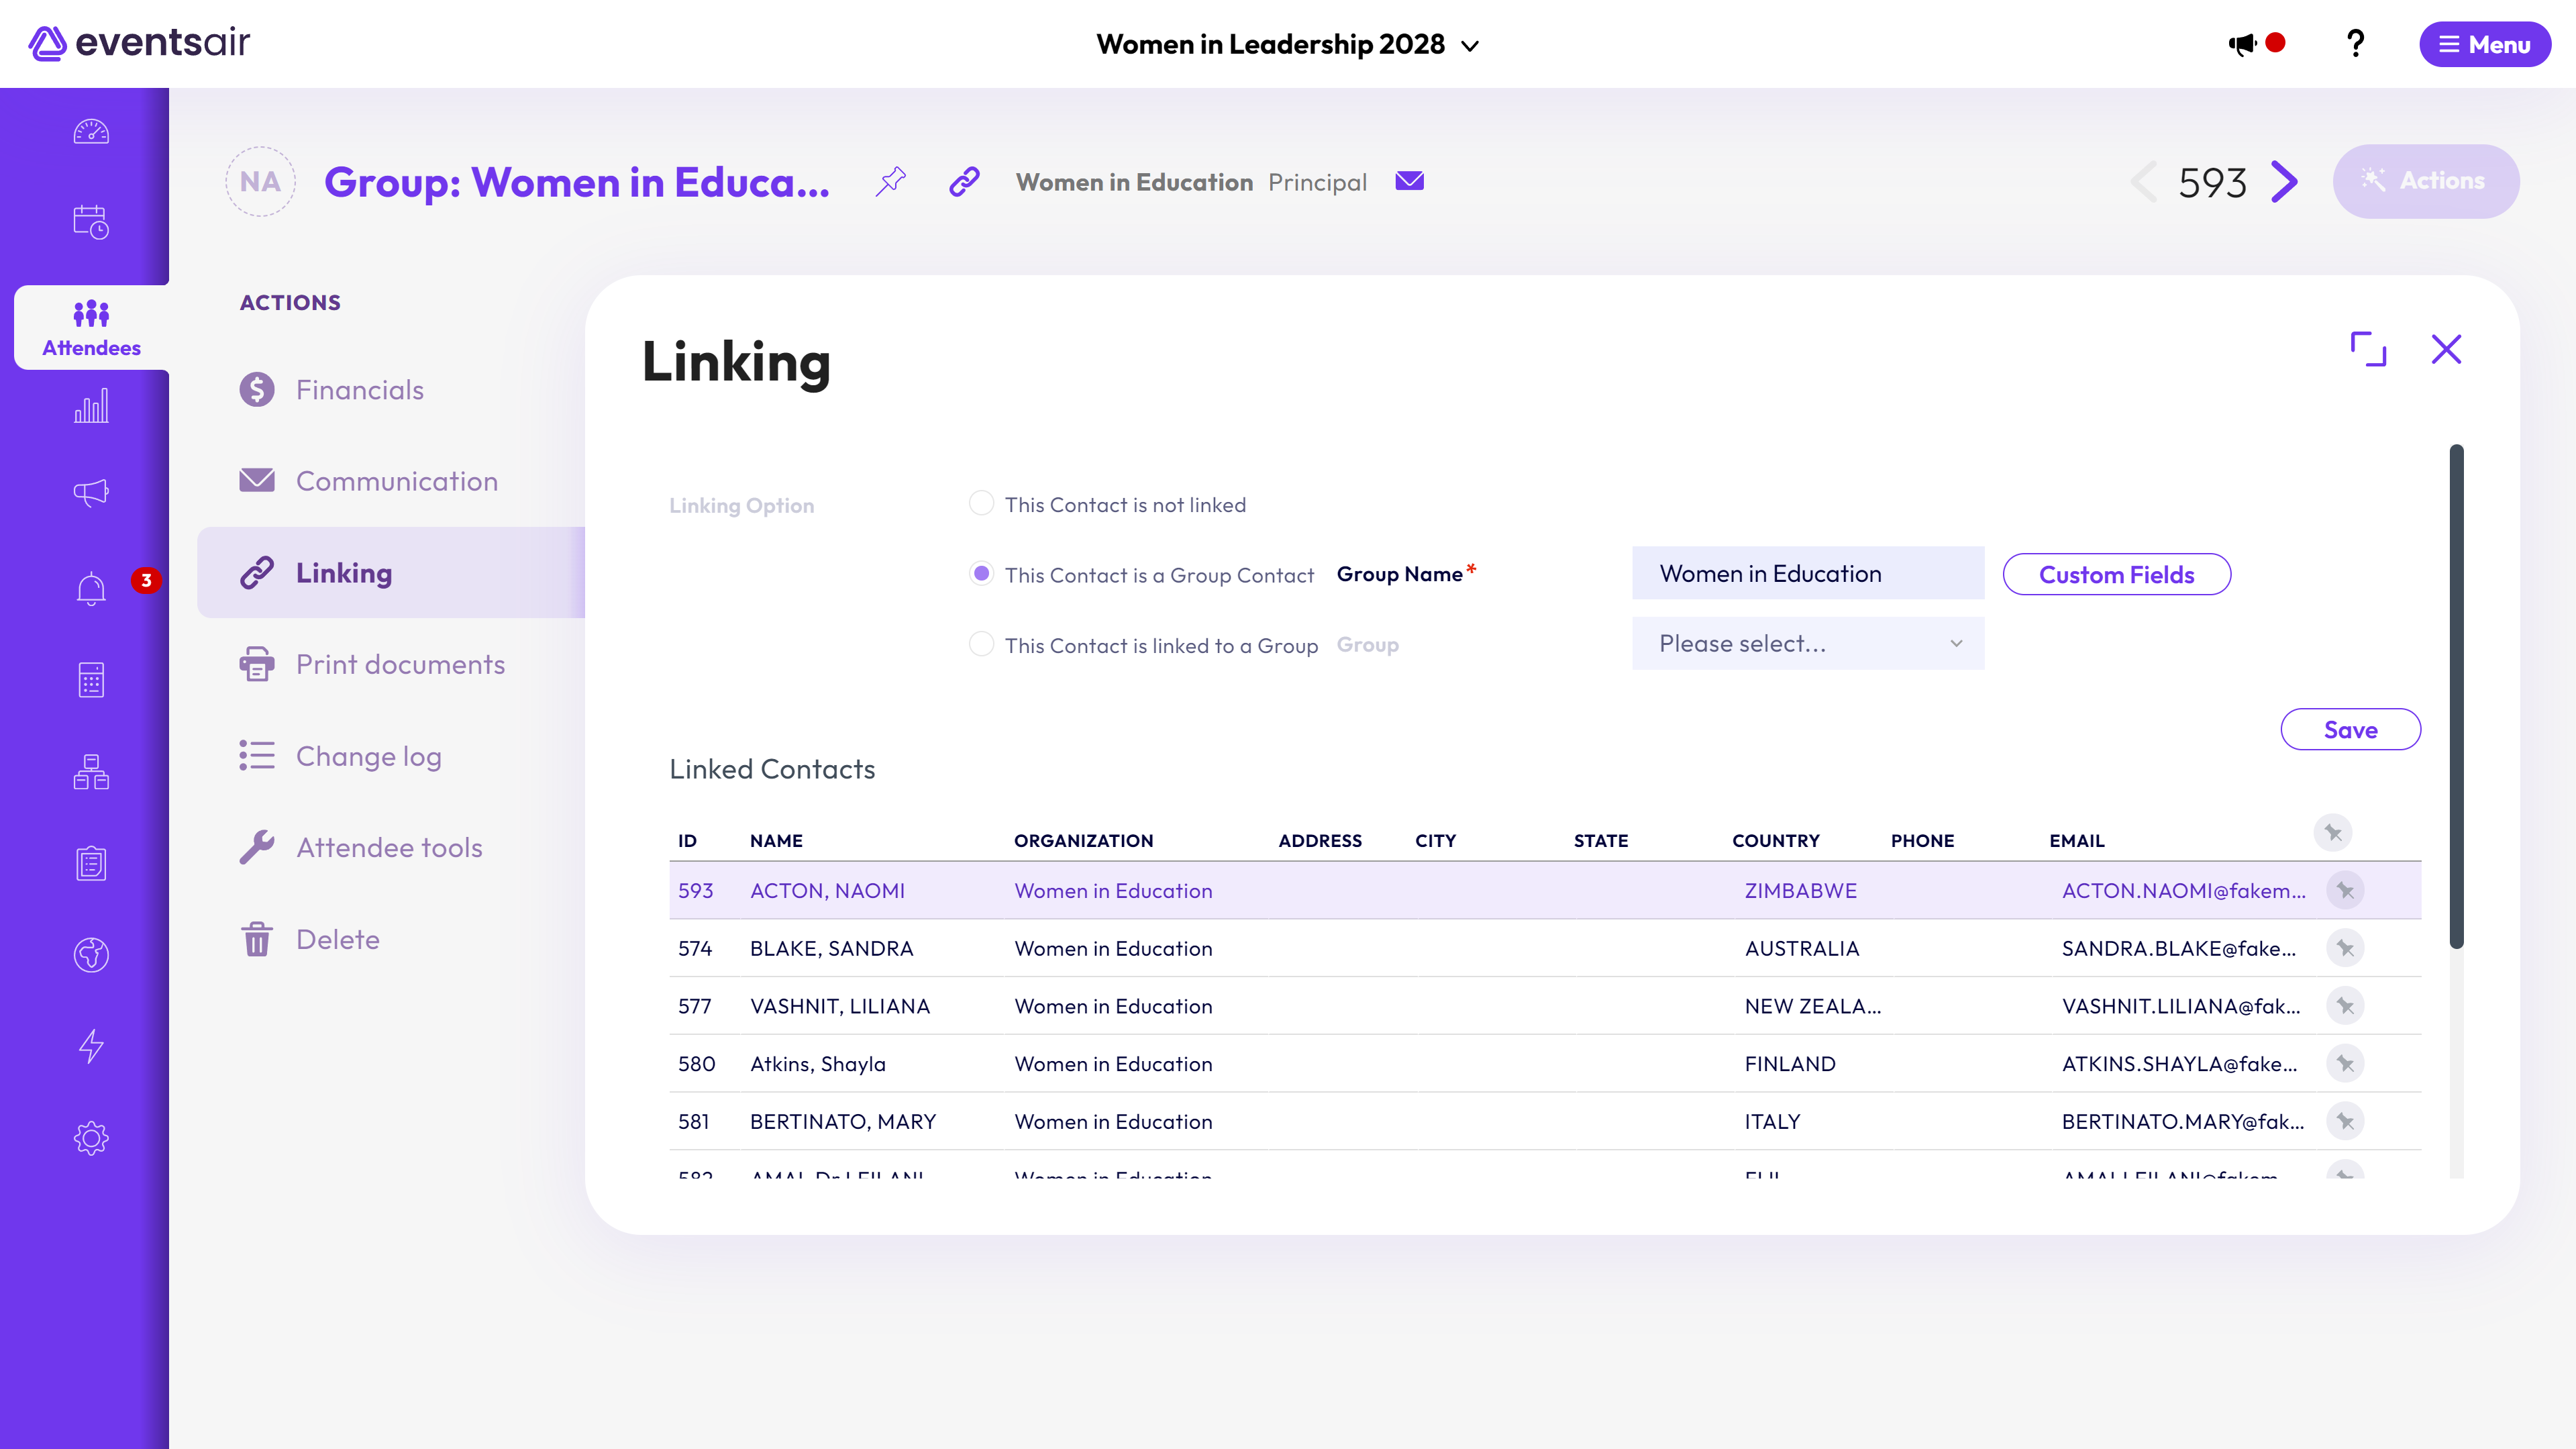
Using the Linking tool (chain icon in Attendee Actions, on the right-hand side of Attendees Panel), you can:
- Assign a Group Contact - This person will be treated as the group leader/coordinator.
- Link other attendees to the group by selecting "This Contact is linked to a Group".
- Unlink someone from a group by selecting "This Contact is not linked".
Assigning a group coordinator ['group contact']:
From a contact record, select Linking (under Actions) on the right side of the screen, then select "This Contact is Group Contact", then enter the Group Name and save.
The example below shows what this looks like when the group already has a number of members.

To link someone to a group (make them a group member):
From a contact record, select the Linking Action button, then select "This Contact is linked to a Group", then select the Group Name and save.
You can only have one group contact. If you want to change a current group member to being the group contact, do NOT go into their attendee record and change them from 'member' to 'contact'. This will NOT swap them out for the original group contact. It'll create a new group with exactly the same name, with only that person in it (and they'll be the group contact of the new group).
In this scenario (replacing the current group contact with an existing group member), you need to create a new group - preferably with a slightly different name. You would then need to link all group members to the new group, by going into each record and changing the group they're linked to.
Once the group contact is the only one left in the group, use the linking tool on their record to 'not linked' (or add them as a member to a different group).
You should also check to ensure any group inventory has been correctly allocated.
Group Accommodation Inventory
Once you've defined a Group Contact, you can manually set the purchase of group accommodation inventory.
A Group Contact can purchase accommodation via a site or portal (see sections below). You can also arrange this manually on their Group Contact record:
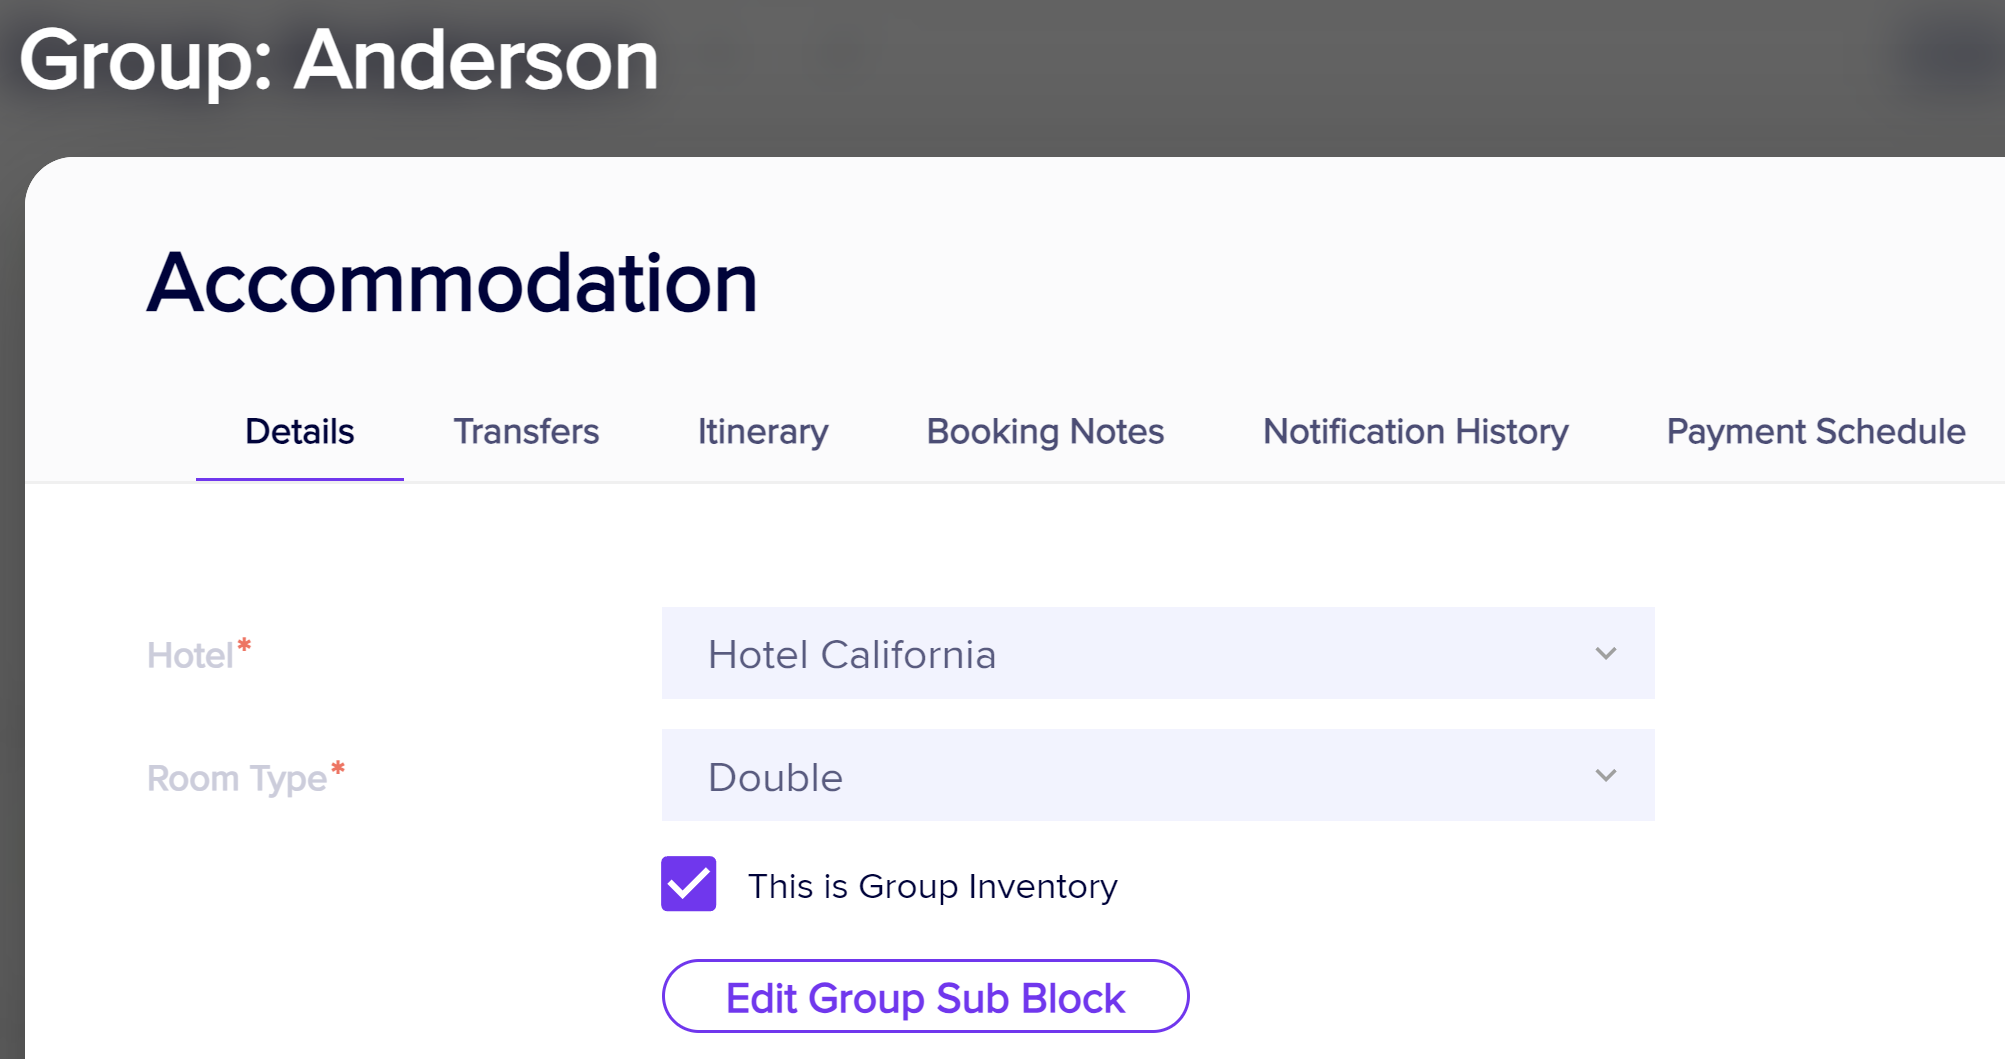
- While in the contact record of the Group Contact, go into the Accommodation module.
- Choose the Hotel and Room Type as required.
- Check the This is Group Inventory check box.

- Once selected, click the "Edit Sub Block" button, and enter the number of rooms per night the group will need.
[This is separate to your other hotel sub-blocks and won't be listed in your accommodation matrix as a sub-block. If you create a sub-block on the hotel beforehand and want to use it for this group inventory, you'll also see that option during this process.] - After entering the other details such as arrival and departure times, select the correct Payment Status (usually, this will be "Purchase" for the Group Contact, unless it's included or complimentary.)
- The inventory will show in purple on the Group Contact's record, as shown in the example below.

To assign group members rooms from this pre-purchased group of rooms manually, go into the group member's contact record and accommodation module, choose the required room(s), then for the Payment Status, choose Group Inventory.
Group inventory for registrations, functions and travel
A Group Contact can also purchase group inventory for registrations, functions or travel.
- While in the contact record, choose a new Registration, Functions or Travel option.
- Choose the desired number of items.
- Choose the payment status (usually this would be "Purchase" on the Group Contact's record, unless it's complimentary or inclusive).
- Check the This is Group Inventory check box. (NOTE: don't confuse this with the dropdown payment status.)
- Again, this inventory will show as purple on the Group Contact's record:

As for Accommodation, when a Group Member uses items from this pre-purchased inventory, the Payment Status should be Group Inventory.
EventsAir will automatically assign the Registration, Function or Travel item to the current group member and display the remaining inventory on the Group Contact's record.
Managing groups and group inventory can also be done by using apps and portals as described below: the Group Registration App for registrations; the Group Accommodation App for hotel rooms; and the Group Allocation Portal for all group inventory items.
Online group registration
Many group coordinators want to register and pay for their group members in one online experience.
You can create dedicated group registration sites to allow a group coordinator (attending or not attending) to register their group members online in one coordinated process, and either pay for the whole group or assign payment to individual attendees.
Discount Codes – you may want to create a discount code for your groups, depending on group size. For example, a discount code for groups of 2-5 members, and another discount code for groups of 6-10.
There's no limit to the number of discount codes than can be used on an online group registration site.
When you add these discount registration codes to your interactive site, the minimum and maximum group sizes you've set will automatically adjust to match.
Build your Registration Site
Using the Group Registration component, you can easily define all required group registration options including discount codes. You can also allow a group coordinator to register a group even if they're not attending the meeting, following the process below:
Adding group features to a registration site
- In the Online Panel, open an existing Interactive Site or create a new one.
- Before any other components, drag across the Group Component. This should always appear at the top of your site builder, before any other modules.
- In the Details tab of the Group Component, you'll find many settings including the "Add 'I am not attending' option". If you enable this, the Group Contact component will appear.

This Group Contact module by default contains many contact details fields (name, organization, email address etc.). You can add or remove fields as needed. Only include whatever details you might need for a group contact who's not attending the event.
Other group settings on a registration site

On the Details tab of the Group component, select your preferred settings for Confirmations, Payments and Editing Visibility.
Expand the Group component, then expand the Group Option component.
This where you can add the group registration and discounts you've set up. You'll need to add a new "Group Option" component for each discount.
The group sizes will automatically adjust to match what you've set up in the Registration Discount Codes (see example below):
Registration Discount Codes set up for Groups (only the 25% option is shown below):

In the Interactive Site builder (under Group, where you've created two Group Options):

If you want to create a single group member registration option without any discount, create a Group Option with a minimum AND maximum size of 1, and no discount code selected.
When viewed in the Interactive Site, it looks like this:

- Your group contact (coordinator) will be able to select a group size based on what you set up in the Group Option(s).
-
If your group contact (coordinator) selects the “I will not be a registered attendee” option, they'll see the additional section to collect their contact details.
If this box is NOT ticked, the first person on the list will be set up as the Group Contact in EventsAir.
The Group will be named according to what's in the Organization field.
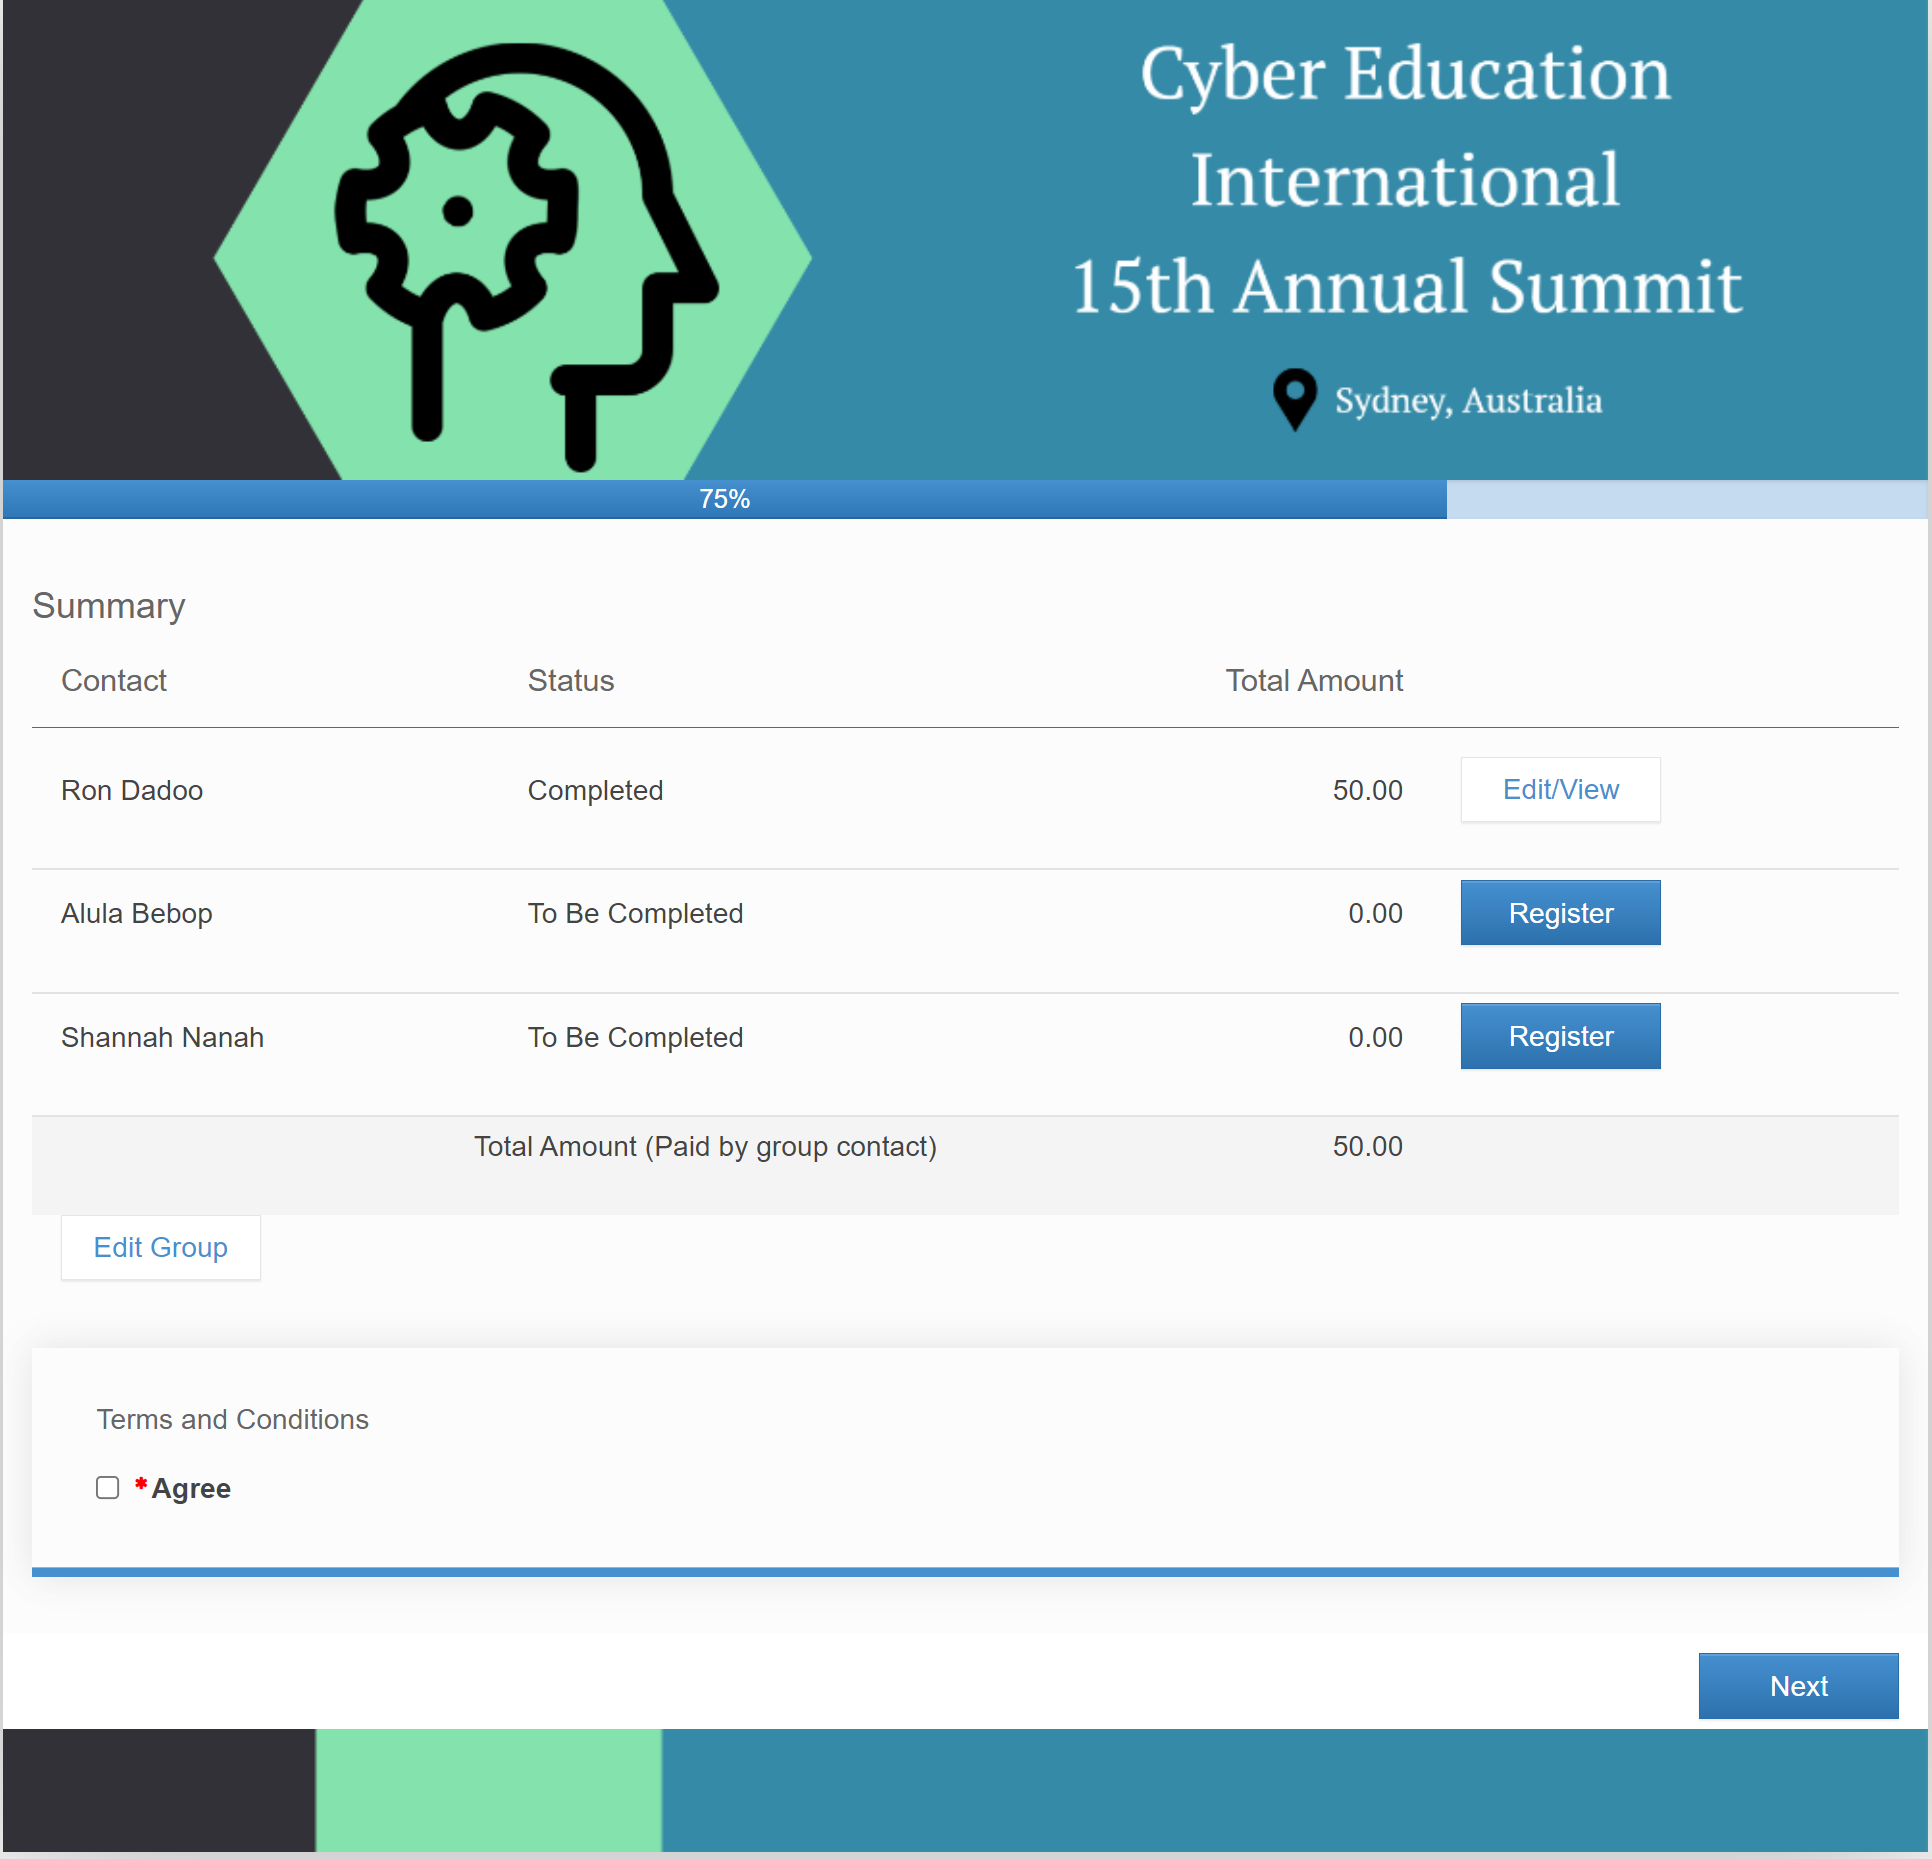
- The group contact (coordinator) can follow through the registration process for each person. The Summary Page shows each group member. Each person's registration can be Edited/Viewed.
- Selecting "Register" allows the site user to proceed with entering the next person's registration details.

Group Apps and Portals
Group Registration App
The Group Registration App is an ideal solution when group membership is changing over a period of time.
Using this app, the group contact (coordinator) can import new group members as needed, invite each group member to register for the event, and process payments by either assigning them to individual group members or paying for them in a group invoice.
You create the app, then send the link to the Group Coordinator (Group contact). Read more about setting up the Group Registration App here.

When the group contact (coordinator) opens the Group Registration App, they'll see the following pages:
Home Screen
When you're setting up the app, add any special instructions for your group contact (coordinator) here.
Group Coordinator Details
The name of the Group Coordinator (contact) can be added or updated here.
(For this to work, when you create the app, use the App's Settings tab to add a link to registration site).
Group Details
This page displays all members of the group, and gives options for each one:
- Register - for this to work, you need to link to the registration site in the App setup.
- Email Registration Link - the group contact (coordinator) can send a link so a group member can fill in the Registration Form themselves (again, you need to nominate the correct link for this in the app settings).
- Remove Contact - the group contact (coordinator) can remove this person from the group.
At the bottom of the Group Details page, there are options to:
- Add Registration - A brand-new group member can be created. The coordinator fills in basic contact information - name, address and email. Pressing "Register" will take the user to the Registration Interactive Site you specified in Registration Form in the App setup.
- Import Contacts - A file, either exported from another software package, or created manually, can be uploaded to import a number of group members.
- Download Template - The group contact (coordinator) can download an empty Template file suitable for filling with details, then importing into this Group using the Import Contacts button.
Invoice and Payment
All Group members are listed with details their registration, payments, and money owing.
- Press Group Payment allows the user to pay for them all together in a single payment.
- Press Individual Payment allows a user to pay for each one separately.
A user can also see a list of all Invoices generated, and press View Invoice to examine each one.
Resend Confirmation
Ticking the checkbox next to any Group members will Re-send a Confirmation. To see what this Confirmation will look like before sending, the group coordinator (contact) can press the View Confirmation button.
It's also possible to include an email address in the CC Email field, to also send a copy of these emails to another person.
Reports
Any reports enabled in the App setup will be available here. The Group contact (coordinator) can produce up-to-the-minute lists from the live database.
Group Accommodation Portal
The Group Accommodation Portal is a powerful app that lets a group contact manage room blocks.
The group contact can see the room block by allocated and available rooms in a grid. They can manage existing group members with the ability to edit their hotel reservation details and cancel if needed. They can also add guests manually one at a time or import multiple guests in a single import process.
Setting up and configuring the Group Accommodation Portal is extremely simple as there are no areas that require additional information – just make sure the text on each screen is as you require and set the open and close dates for the portal.
Only group contacts who have purchased group Accommodation inventory will be able to log into the app and manage their group accommodation details.
Room Block

The Room Block view shows the entire accommodation block in a single, easy-to-manage grid.
For each night and room type, it shows:
- Day and Date
- Number rooms allocated
- Percentage of rooms allocated
- Total rooms in block for the specific day and date
Import New Guest

This option lets the user easily add additional group members and assign them to rooms in the chosen room block.
There are four steps involved in Importing New Guests
- Download the Guest Template – this template is specially formatted with dropdown selections for hotel / room type, check in date and check out date.
- Upload the Completed Guest Template File – choose a filled spreadsheet and import the group members in just a few seconds.
- Review Uploaded Guest Details – select all or select individual guests to import.
- Import Selected Guest Details – imports the selected guests.
Manage Guests
 Once imported, the Manage Guest option allows searching for specific guests based on:
- Name
- Hotel
- Room Type
- Check-In Date Range
- Check-Out Date Range
Canceling and re-instating Group Accommodation
A user can indicate they want to see canceled bookings as well. Selecting the Show Canceled Bookings checkbox results in a view of both canceled and current reservations:

Selecting Edit on a canceled reservation gives the option to de-select the cancellation and reinstate the record.

Unchecking the box will re-instate the reservation immediately.
The Group Allocation Portal
This portal combines features of the Group Registration App and Group Accommodation Portal, and includes features for managing group Functions and Travel. Via the Group Allocation Portal. a group contact (coordinator) can:
- See group inventories for Registrations, Functions, Accommodation and Travel
- Add, import and invite new group members
- Assign inventory items to group members
- Send confirmation emails to group members
- Cancel group members
- View group reports
Read more about setting up the Group Allocation Portal here.
Reporting on Groups
All reports can be filtered on specific data, and with group information filters, you can produce detailed reports specific to all groups or one particular group. You can filter on the following:
- Group Name
- Group Contact (Record Type)
- Group Member (Record Type)
- Is Not Linked (Record Type)

When using these search filters, you can create specific reports (and Quick Reports) that display specific group details for contacts, registration, functions, accommodation, travel and much more.


