
These ideas are ready for you to adapt and add elements and timing to suit your needs and schedule.
For each checklist item, we’ll also give recommendations for you to consider, but of course you’ll have your own priorities and processes. You should also review the related articles for all topics.
The number one recommendation for all the below is to properly pre-test processes and equipment beforehand, including Internet connectivity and speed*, and communicate well with your team and attendees.
*We recommend you have your own dedicated Internet connectivity/ network for your registration area, and not use a hotel or venue’s shared internet.
Checklist | |
|
1. Prepare your Run Sheet 2. Plan for EventStream (private social network) 3. Plan gamification with EventStream Engage 4. Prepare your Attendee App 5. Prepare your Organizer App 6. Prepare last-minute communications 7. Plan for Onsite Alerts 8. Plan for Onsite Text Messaging 9. Order and test Internet access 10. Design name badge templates 11. Prepare for name badge printing 12. Plan for Onsite Payment Collection |
13. Plan for Auto Event Check-In 14. Plan for a Self Check-In Kiosk 15. Plan for a staffed check-in desk 16. Using the Access Control App 17. Plan News Updates 18. Plan for Live Polling 19. Plan for Live Q&A 20. Plan for onsite presenter and AV management 21. Manage giveaways and item collection with the Collection App 22. Test onsite before opening registration 23. Plan for EventsAir Automated Updates |
Prepare your Run Sheet
 The Run Sheet is a system-wide management tool to help you manage all those inevitable micro-tasks.
The Run Sheet tool lists which tasks are allocated to which team members, showing exactly what needs to be done, where and when. Tasks are checked off when completed and the Run Sheet updates instantly.
The Run Sheet, which is in the Project Panel of EventsAir, is also in your Organizer App (which you can access on any computer or mobile device), so you can monitor task progress in real time.
The Run Sheet can also be accessed by team members who aren’t registered users of EventsAir.
Recommendations:
- Build your Run Sheet before the start of the event.
- Pre-assign team members to the Run Sheet using the Team Member setup function.
- Review the Run Sheet with your team.
- Test access to the Run Sheet from the Organizer App.
- Include the My Run Sheet option in the Organizer App so each team member can see their specific assignments (you should select the View All option for My Run Sheet).
- Ensure your entire team can access and understand your Run Sheet.
Plan for EventStream (private social network)
 |
 |
EventStream is an exclusive, private social media experience for your event, where attendees can post and share photos, videos, comments.
Attendees can participate in EventStream through their Attendee App. You can also project the EventStream Wall, a scrolling display, in public areas and in meeting rooms. You can even set it up to automatically search Twitter and display any tweets using the event hashtag.
You can manage the entire experience with the EventStream Manager, including moderating posts and adding in sponsor advertisements. Towards the end of your event, you can auto-generate the EventStream Album, a video highlighting the best images set to music, and project this to your attendees.
For hybrid events, remote attendees can participate in the same social network interactions, creating additional connections and engagement.
Recommendations:
- Plan your EventStream details well in advance, including artwork for the EventStream Wall (e.g. event logo and sponsor graphics).
- Map out where your EventStream Wall will be displayed or projected (e.g. in the foyer outside your meeting space or in a lobby area for evening events).
- Let attendees know via an email or static content (in the Attendee App) that describes how to post, like, comment and share.
- Include various EventStream activities in your EventStream Engage gamification goals (e.g. ‘create 1 new post to get 10 points’).
- Use the EventStream Reporter option to help kick-start social posts and comments at the beginning of your event.
- Test your EventStream Wall ahead of time, using the Simulation Date option.
- Use the Leaderboard App to display leaders both in EventStream and EventStream Engage.
- If you want to create an EventStream Album video presentation, organize the music backing track before your event and decide where it will be shown as part of your closing activities.
Plan gamification with EventStream Engage
 EventStream Engage is a comprehensive gamification platform with numerous games and goals to encourage interactions between attendees, speakers, sponsors, and exhibitors.
Gamification is all about engagement and creating activities, games, quests and goals to encourage your attendees to engage such as by:
- Installing the Attendee App
- Connecting with other attendees
- Visiting exhibitors
- Using social networking
- Taking part in Live Polls
- Answering trivia questions
- Checking into sessions and functions
- And much more!
All games and activities are built around goals, which are the specific engagements or actions you want to see happen. Attendees can earn points, accumulate badges, win prizes and redeem coins to purchase items and gifts.
You can make gamification via the EventStream Engage platform as simple or comprehensive as you like. Brainstorm with your team and review related articles to help spark ideas for goals, badges and prizes.
For hybrid events, your remote attendees can also participate and interact with onsite attendees, speakers, and exhibitors.
Recommendations:
- Define your event’s gamification goals and strategies (i.e. the what, where, and how people will participate and how you’ll encourage that).
- Build your event’s Engage Ecosystem and Economy (points, prize drawings and gift redemptions) – a spreadsheet is helpful.
- Create an introductory document or static content in your Attendee App to explain how EventStream Engage works and the various games and activities that can be used to earn points.
- If possible, create your own badge graphics to encourage participation.
- If you have a redemption desk, prepare a sign showing all gifts and the coins needed to purchase them.
- Use the Leader Board App to promote friendly competition.
- Use Engage Analytics to measure event success, and share with stakeholders, such as clients or exhibitors.
- If possible, use tablets with scanners installed for faster gift redemption.
Prepare your Attendee App
 The Attendee App allows your attendees to engage in many aspects of your event, network with others and receive alerts and communications.
You can build this app in less than 30 minutes, but you’ll want to spend time reviewing and testing functionality well in advance of your event.
Because the Attendee App is installed like a native app, some functions work even when not connected to the Internet. Others, such as social media and messaging will connect to the Internet for updates.
You can add components to your Attendee App such as EventStream, EventStream Engage Live Audience Polling, Live Q&A, and Session Surveys. You can also create helpful content for your attendees, such as local restaurant listings and contact information.
For hybrid events, those onsite can connect with remote attendees and presenters using Meeting Hub. This is a great way to help all attendees, exhibitors and presenters – whether attending live or remotely – to interact with one another.
Recommendations:
- Design and build the Attendee App well in advance of your event.
- Test all icons and links.
- Prepare a communication email or document instructing attendees on how to access and install the mobile app on their smart phones or tablets. This can be a postcard or an email. Be sure to include links or QR codes for attendees to install the app. (There’s a help document called Attendee App Quick Start Guide that gives you some example text – see the Related Articles section.)
- If possible, have a dedicated staff member onsite to assist with app installation and use. Print the QR codes that link to the app, in both the App Store and Google Play, to make it easier for attendees to find.
- If you are selling advertising on the mobile app, be sure to request all images, content and links well in advance.
- Rigorously test your Attendee App on several different devices (Android, Apple, and web browser versions).
- Easy to forget: Turn on Automatic Updates before you go live at your event.
Prepare your Organizer App
 The Organizer App is a powerful, cloud-based tool for organizing your onsite team. It brings a real-time portal for managing all aspects of your event directly to your mobile device.
The Organizer App lets you see the agenda, check in attendees to sessions and functions, search for attendees, send out alerts, communicate with your staff, access run sheets, run reports and more – even monitor your Twitter feed.
You set up and publish your Organizer App in much the same way as your Attendee App – create and set the dates, then use the drag-and-drop builder to create content and details, then publish.
It can also be accessed by team members who don’t have an EventsAir account.
Recommendations:
- Design and build the Organizer App well in advance of your event.
- Test all icons and links.
- Make sure your staff have access to the Organizer App (using the Team Member setup option).
- Prepare emails and messaging for your team about how to install and use the Organizer App.
- Perform several rounds of tests on different devices and gain feedback on use and operation.
- Run a practice session with your team on how to use the Organizer App.
- Make sure your onsite team have their Organizer App installed and working before your event begins.
Prepare last-minute communications
 Just before your event, you should communicate with your attendees to cover off any last-minute questions or concerns they may have.
If you’re offering onsite check-in and badge printing, include instructions about this along with a QR code or Bar Code they can use for Self Check-in or give instructions for Auto Event Check-in.
* When sending by email, check the Status section of the Communications Panel to make sure no emails have failed, are queued, or are stuck in the Outbox.
Recommendations:
Check that you’ve included all key information, such as:
- Location of event
- Best ways to get to the venue (including from the airport and travel hubs)
- Where to find the registration/check-in desks and when they’ll be open
- Bar codes or QR codes for onsite check in
- Dress code
- Special events or programs
- Changes to the program
- Attendee App installation instructions
- Who to contact for other queries
Plan for Onsite Alerts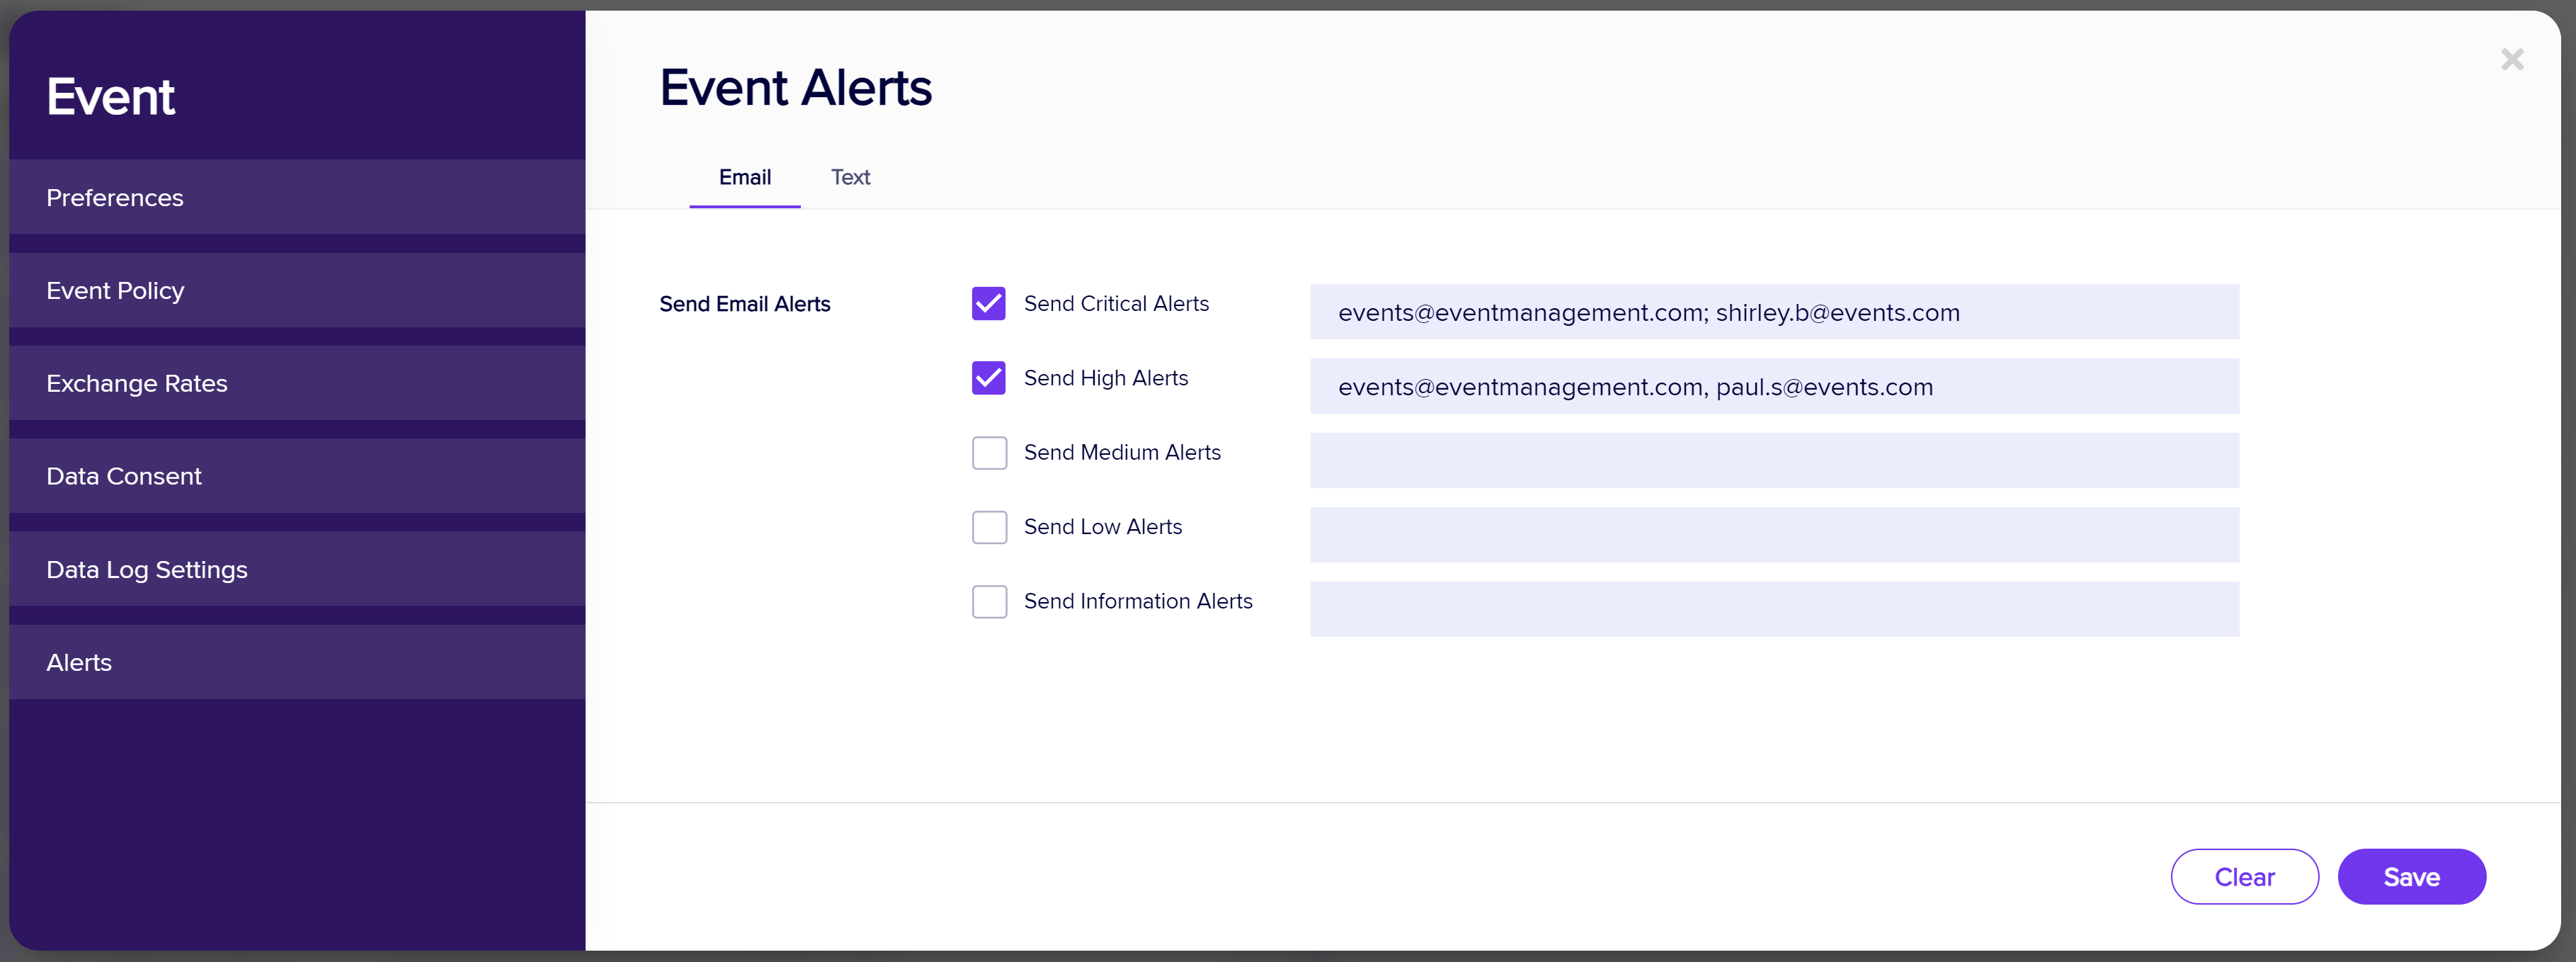

The EventsAir Alert System helps you stay on top of any urgent updates and although these are normally used before the event, they can also be very important onsite. You can define Event Alerts in the Setup Panel, and assign different team members to receive different types of alerts (by email or text). Multiple people can receive the same alert – you can set this up by adding more than one email address, separated by a comma, when creating the alert.
Every new alert will be indicated by a number and a color (orange or red) on the Event Alerts icon in the Organizer App.
Recommendations:
Consider setting up Onsite Alerts to tell you when:
- A tour or activity sells out.
- VIP attendees check into events, sessions, or functions.
- Last minute hotel bookings are filling available inventory.
- Anything else you or your team need to know about immediately.
Recommendations for sending Alerts to attendees:
- Use the News, Alerts & Posts function in the Communications Panel to send instant alerts to the Attendee App, Organizer App, OnAIR Portal, or EventStream.
NO CHANGES TO APP ALERTS WITHIN 5 MINUTES OF SEND TIME When amending or deleting an app alert - designed to appear in either an Attendee App or an Organizer App (or both) - you're unable to edit or remove the app alert within five minutes of the send time. [New app alerts can still be created, as the queuing system handles them differently.] If you try to make changes or delete an app alert within 5 minutes of the alert being scheduled to send, this may appear to work, but doesn't have time to take effect.
Plan for Onsite Text Messaging
 Your Attendee App and Organizer App can help keep everyone connected, but there’s no guarantee everyone will use them. Another way to send immediate communications to everyone at your event is by enabling text messaging.
You can do this by setting up an SMS Gateway, subscribing to a Text Message service provider for your region, and setting up these details in EventsAir.
Recommendations:
Set up your SMS gateway well in advance so you can send out text messages to individual attendees, selected groups or all attendees.
Gateways currently supported by EventsAir Include: | |
|
|
Quick Tip
Text messages are a useful way to send out Attendee App installation links and instructions. You can also include a personalized Site Link with Auto Login Token for the Attendee App into the body of your text (using the Insert Merge Field function, under Planned Communication).
Order and test Internet access
Having consistent, reliable Internet connectivity, preferably high speed, is now a requirement for most events.
Free/shared Wi-Fi, for example provided by the venue, is often quite slow, especially if many people are trying to use it at the same time.
Recommendations:
- Consider an external vendor – If the venue’s Internet service (or preferred provider) isn’t the best choice, consider working with your own external vendor.
- Consider wired connections – Wireless connections are usually slower and more prone to interference. For this reason, many meeting organizers insist on wired connections for their check-in areas, speaker presentation facilities, and/or media rooms.
- Investigate the facility’s access points – For example, if there’s only one access point in a ballroom, the signal may be poor or unavailable in the corners of the room (as signal coverage is circular).
- Test beforehand – Use a tool such as speedtest.net to check onsite Internet performance (minimum speeds of 50 megabits download and 10 megabit upload). If needed, be proactive and speak with the vendor well before your actual event. Many users recommend a 20-50 MBPS dedicated line and a backup Wi-Fi or 4G/5G router as well. You could use the venue’s internet, and insert a SIM card in the router, so if the venue experiences a connectivity issue, the router will automatically switch to the SIM card (and back again).
Design name badge templates
 Attendees always appreciate an attractive and functional name badge design.
While pre-preprinting badges is easily managed by EventsAir, many event planners use onsite check-in tools that will also print name badges on-demand.
The latter allows clients to manage their own check-in and badge collection, which can greatly reduce lines and wait times (with fewer staff needed).
Recommendations:
- Confirm size (also important for ordering badge holders and printers).
- Work out what needs to be on the badge.
- Design your badge to make images and writing as large as possible, for legibility.
- Make sure images are optimized (in terms of both dpi – dots per inch – and file size). Too large will slow down your badge printing, and too small will cause images to be grainy and/or pixilated.
- Add a QR code or bar code to the badge (for access and lead retrieval).
- Conditional Logic can be used to add color bands for different registration categories.
- Design and test print your badge template.
Prepare for name badge printing
By creating a name badge template, you can include on-demand (one at a time) onsite printing of name badges. Attendees use either self check-in, auto event check-in or assisted check-in, set up via the Onsite Portal. This triggers the printing of their name badge, ready to be placed in a badge holder and given to the attendee.
Printers may be thermal (black print only, similar to how a receipt or fax is printed) or ink jet type printers (for full color).


These printers may be purchased or hired, and many also come with a touch screen kiosk function you load onto a computer or tablet, making it easy to integrate with EventsAir.
You should test your printer hardware well in advance, whether or not you plan to use staffed check-in or Self Check-In Kiosks.
You should also test all the relevant connections and processes early and often (and make sure your team is up to speed) so that by the time you arrive onsite, everything is well organized.
Talking with your IT network specialist can be very useful at this point to check that all your systems will integrate.
Recommendations:
- The Self Check-In Kiosk allows repeat check-in for the same contact person, which is very useful when testing.
- Print out a selection of staff emails with bar codes or QR codes so you can use these over and over again when testing the check-in process. It is especially important that bar codes and QR codes are properly sized so that scanners can read them properly.
- Test a selection of badges to check specifically for photo and graphic quality. Remember, photos should be optimized at around 100k in size and be at a high enough resolution for crisp photo printing.
- Similarly, test scanning of barcodes and QR codes with a number of different attendee records to confirm proper scanning.
- Always test all categories of name badge if used (e.g. Registered Attendee, Partner, Exhibitor etc.).
- Scanners can be set to continuous mode, which can speed up onsite self-check in.
- While ordering consumables for printers onsite, allow for some waste to cover testing, paper jams etc. We recommend ordering an extra 20% or more of your consumables and badge stock.
- If you’re using one printer networked to more than one computer, a 2:1 or maximum 3:1 ratio is recommended (i.e. no more than 2-3 computers using the same printer).
Plan for Onsite Payment Collection
 There are two ways to collect payments onsite:
- Use a web interface or a credit card swipe terminal to have payments made directly into your merchant account or gateway. You then need to process the payment manually in EventsAir, including entering the approval code.
- Collect payments directly in EventsAir, via online payment form. This will process the payment and show the authorization code automatically in the contact record.
There are different ways you can collect payments onsite:
- Processing credit payments outside EventsAir is simple, and it’s what most people are used to. Attendees may swipe or tap their card to pay, or even pay cash for smaller amounts. However, you need to train your onsite staff to enter payment details into EventsAir, or create a process where the credit card receipt is collected and used for financial entry at a later time.
- Similarly, if receipts are emailed, (such as with Stripe and other gateways, or if you accept payment via wire transfer or other proof-of-payment systems), you need to collect the day’s payment details and manually process in EventsAir at a later time.
- Processing within EventsAir can be done via an Interactive Form with contact information and a payment option. Attendees can pay online, or staff can access the form (from the Organizer App or Onsite Portal), confirm contact details, enter in credit card details and process the payment. You could also set up an interactive site purely to accept payments within EventsAir and have attendees log in via their unique auto log-in token.
You should always test the payment processes from the actual portals or apps you plan to use well in advance.
Plan for Auto Event Check-In
 You can automate the check-in process using the Attendee App’s Auto Event Check-in feature. This uses a beacon (usually purchased through EventsAir) and/or QR code displayed prominently in the check-in area.
When an attendee walks into a registration area, and their Attendee App is running (and Bluetooth is enabled), your beacon can connect to their app, check them in, and print their name badge. As a back-up, or an alternative, if you don’t want to use a beacon, you can display a QR code and instructions. Attendees scan the QR code for instant check-in and badge printing.
Recommendations:
- Map out the flow of registration and the different Auto Event Check-In scenarios. For example, you may have one Auto Event Check-In process for Exhibitors and a completely separate one for Attendees (different badge pick-up desks, for example).
- When printing a check-in QR code for posters or signage, be sure to test that check-in and badge printing work correctly; check this both before and immediately after your signage is printed so you can troubleshoot any problems.
- If you are using a beacon, be sure to test all operations in advance.
- Let your attendees, know via email and/or text, the steps for Auto Event Check-In (for example, the Attendee App must be installed and open, and Bluetooth must be switched on).
Plan for a Self Check-In Kiosk
 To reduce wait times and long lines, you can set up Self Check-In Kiosks. Attendees type in their name or show their unique barcode/QR code to check themselves in (which works especially well if you’ve emailed them with instructions beforehand).
They then proceed to a badge pick-up point to collect their badge, which has just been printed, triggered by their check-in. You could also withhold badge printing until any outstanding payments have been made.
You can set up any number of Self Check-In Kiosks, using any computer, laptop or tablet connected to the Internet. New registrations can also be accepted by this method.
Another handy feature is the Check-in Message Note Type, which can be used to create personalized messages for specific attendees which appear on the kiosk screen when they check in.
Recommendations:
- Test the kiosk installation well in advance.
- The Self Check-In Kiosk works best in a Chrome browser, using kiosk mode.
- Configure some kiosks to either scan codes or search when a name is typed in, and others for Instant Scan and Print Mode only. Keeping the latter separate and always ready to scan speeds up the process for attendees who have their QR code or bar code ready (printed or on their phone).
- If you’re accepting onsite registrations, use separate kiosks. You won’t want to delay attendees who’ve already registered and just need to check in.
- If your attendees are bringing guests or partners, set up their attendee record to also print guest/partner badges at check-in.
- If your name badges feature photos, you can also allow attendees to supply or re-take their photo during check-in.
Plan for a staffed check-in desk
 The Onsite Portal allows you to give your registration team access to some EventsAir functionality without needing full access or extra EventsAir licenses.
Approved staff members can see and edit basic attendee information, register new attendees (walk-ins), print name badges, and review printing statistics.
Recommendations:
- Review Onsite Portal default settings. Express Check-In option allows quick search, check-in and badge printing. If money is owed, Express Check-In will not be available.
- Express Check-In can be bypassed to access the attendee details screen (to add a photo to the name badge, review details, collect or record payments and accept new registrations).
- Stress-test the portal installation well in advance.
- Training is crucial. Schedule a training day for your temporary staff and make sure they’re familiar with using Onsite Portal, adding badge stock to printers and other necessary tasks. It helps to create small ‘cheat sheets’ (laminated note cards) with the basic steps of checking someone in and printing their badge.
- Day one of your event will always put maximum load on the system. To prevent long queues, pre-plan, and check all the processes involved including attendee search, badge print, payment, photo capture and more. It helps to have separate counters for these different tasks when possible.
- Your entire team needs to have a clear understanding of the operational flowchart and have gone through a trial run to test every process to gauge load, staffing needs, etc.
- Try to have a badge printing backup in case of onsite challenges, such as the Internet or network failing. If you have pre-printed all your badges as PDF documents, you can use these to print badges if needed.
 Using the Access Control App
 Using the Access Control App
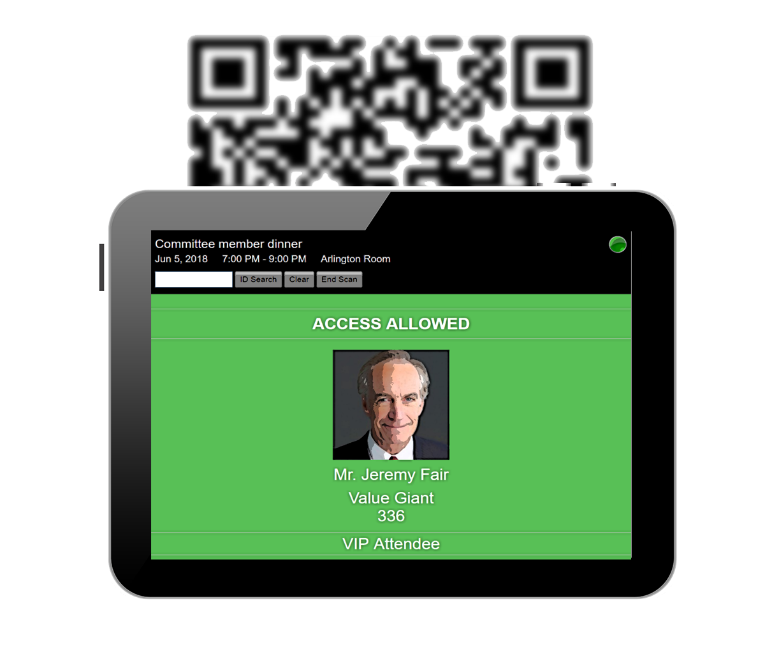
The Access Control App is extremely useful for managing access to your event, sessions, functions, and scheduled activities, both onsite and offsite.
This app, typically running on a tablet, lets you quickly scan in approved attendees and verify access privileges. If you’ve collected attendee photos, these will also be shown as an extra security feature.
The Access Control App can record entry, exit and re-entry into a location/session (and also has a Contact Tracing feature). You can choose from a list of pre-configured locations, or you can enter in a new location if needed.
While scanning, the app doesn’t run database updates. After scanning, data is uploaded back into EventsAir and can be used to run reports on the event or session.
Recommendations:
- Map out which events or functions have restricted access, or where access needs to be managed. You can either grant access to individual attendees, or give access rights to a specific registration category (or group of categories). For example, you may have an opening night cocktail party which is only for registered attendees and presenters, but not for partners and guests, staff, or exhibitors. You can assign access just to two registration types (attendees and presenters). Everyone else will be marked red on the Access Control App and be denied entry unless you make an exception for that person.
- Use good quality scanners that have been tested prior to the event; preferably wired scanners attached to a tablet or mobile device.
- Test extensively on the actual tablets you plan to use, including by downloading attendee data and operating in ‘offline mode’. This is a critically important feature and you want to be comfortable in using the portal under different conditions.
- Where entry is restricted, lines and bottlenecks can cause frustration as attendees enter sessions or functions, so scanning must happen in seconds. In addition to testing your technology, properly train your staff to prevent any problems on the day.
- While scanning, the app does not connect to the live database, as it’s working off a local saved copy. This means that if an attendee registers after you’ve opened the app and gone into scanning mode, they may not appear on the access list. If you think this is likely, you may need a process to account for this.
- When not in scanning mode, upload the scanned data and return to the session selection page to reconnect to the database and download any new data.
Plan News Updates
News updates are a great way to keep your attendees engaged and informed throughout your conference.
You can announce changes to the schedule, send out party photos, give biographical information about an upcoming speaker, and more.
You can plan this type of update to be sent via the Communications Panel.
However, you may also want to send News and Alerts to your attendees directly from the Organizer App.
Recommendations:
- Create a timeline or storyboard of the news articles you’d like to publish for each day of your event (for pre-planned news).
- Consider assigning a team member to be responsible for reviewing and updating news updates prior to sending out.
- Ensure you know how to send news alerts from the Organizer App in case this is required during your event.
Plan for Live Polling
 Live Polling allows you to display questions to your audience live during a session and accept submitted answers in real-time.
You can show results as a bar chart or Word Cloud.
At your event, your onsite attendees will use their Attendee App during the session to view and respond to live poll questions. Responses can be shown in both the Attendee App as well as being projected on a screen, using the Live Poll App Portal.
For your hybrid events, your remote attendees will also be able to respond to live poll questions, through the OnAIR portal, at the same time your onsite attendees are responding. This is a great way for all attendees to participate and engage with each other.
Recommendations:
- Be sure you fully understand in advance what’s required and pre-train all presenters who plan to use Live Audience Polling, along with your AV provider. Very specific timing and coordination between the AV team and the presenter is needed. (Ask your EventsAir account manager for more training/information/support if needed.)
- Write Live Poll questions in advance if possible and ask presenters to submit live poll questions beforehand so they can be already set up.
- Determine how Live Polling will operate at your event (single response, multi-response, or Word Cloud)?
Test Live Polling in advance. (You’ll need to adjust the date and time of your sessions in order to properly test, and change it back afterwards.) Be sure to test the Presenter Portal and the Attendee App at the same time.
Plan for Live Q&A
 The Live Q&A function in the Attendee App is an ideal way for audiences and presenters to interact in real time during a session or presentation.
At your event, your onsite attendees will use their Attendee App to see and respond to Live Q&A. Responses are usually also projected on a screen next to the presenter. Attendees can be given the option to rate questions with a Thumbs Up or Thumbs Down.
Your presenter can see questions as they’re being asked, mark the next question to be answered, and indicate which questions they’ve already answered.
Your presenters can also moderate questions before they show up in the Attendee App, delete questions, and/or prioritize questions to be answered first.
For your hybrid events, your remote attendees will also be able to respond to Live Q&A at the same time as your onsite attendees, which is a great way for all attendees to participate and engage with each other.
Recommendations:
- Consider how your want your presenters to manage Live Q&A – either on their own or with a Live Q&A moderator.
- Consider whether or not you want to enable features such as anonymous posting, moderation of posts, Thumbs Up and/or Thumbs Down ratings.
- Consider how you want your attendees to see the Live Q&A – in the Attendee App, on a large screen using the Live Q&A Feed, or both.
Plan for onsite presenter and AV management
 Managing your guest speakers and AV production onsite can be a challenging process. Speakers make changes to presentations at the last moment, forget where their room is located, or experience challenges with AV or Internet at inopportune times. It’s the nature of the beast!
There are tools in EventsAir that make the management of speakers AV much easier to handle, however it’s up to you whether or not you use them.
Recommendations:
- Consider creating a dedicated mobile app for speakers. You can have more than one Attendee App, so you may want to create a custom version for speakers and presenters. You could include custom content that only a speaker would need to access, such as contact numbers for the speaker management team, and send alerts just to presenters.
- Limit and manage AV and Internet options for speakers – while not related to EventsAir, experienced event planners can share horror stories of how they can spend all day running around adjusting AV, sound equipment and internet for individual speakers. It pays to limit the AV choices for large speaker programs and to have standard packages for presentation rooms (e.g. wired connection and standard microphone).
- On the other hand, if you’d like your presenters and your AV team to be able to make last-minute updates to presentations and AV requirements, consider using the Presenter Prep Room App and/or the AV Technicians App.
Manage giveaways and item collection with the Collection App
 Many events offer a registration pack such as a bag with event information, an itinerary, floor plans, and gift items from sponsors and exhibitors.
You may also have other items that can be collected, for example, if you allowed attendees to pre-purchase autographed copies of your keynote presenter’s latest book.
With the Collection App, you can streamline your registration front desk and minimize queueing by having attendees collect items from a separate area.
Recommendations:
- Create a Collection App for each item you are giving out. In many cases, you will simply need one, for the conference satchel or welcome item.
- Each Collection App should be assigned a different Note Type so you can keep track of different items.
- Have a separate counter to your main registration desk.
- Use a scanner in conjunction with your Collection App(s).
Test onsite before opening registration
 One of the most important recommendations as you prepare to go onsite is to run multiple tests and scenarios.
No matter how confident you are in your technology, there are many areas outside your control: outside vendors, paid staff, technology services, and more.
Remember the 5 “Ps: Proper Prep Prevents Poor Performance. You never can test too much!
Recommendations:
- Document your event processes – spend time at least 6 weeks before your event, preferably more, to document the essential steps for installation, configuration and operation of your onsite tools and portals.
- Test technology repeatedly – You should always test technology again just before you pack up for your event, and as soon as you can once you’re at the venue. Never wait until the last minute to test your technology or train your staff.
- Test variations – this is very important, and requires lateral thinking (and, possibly, asking others to think of scenarios you may not have considered). Test bar codes and manual searching for attendees, and test different registration categories. If you plan on allowing attendees to make payments onsite to complete their registration, make sure that process works as well. Likewise, if you’re allowing new registrations onsite (walk-ups), be sure to test that process too.
- Test Internet performance (as described in the earlier section) – Refer back to the relevant section of this document, and remember, if there are problems, speak with the vendor well before your actual event begins.
- Perform an Internet failure drill – this isn’t mandatory, but if you aren’t sure what your team will do if the Internet fails, it’s a good idea. Be sure everyone knows how to check attendees in, print a name badge, collect payments manually, and enter data into EventsAir later.
- Test your backups – test back up hardware and technology. If you bring your own router with a 4G/5G SIM card, test that as well. Can you print name badges manually from a pre-saved PDF file? Are there other back-ups you should test?
- Test confirmation and registration processes once more – be sure to use a variety of confirmation emails and have your team test how actual check-in processes work.
- Role-play different scenarios - Test out what happens if money is owed, there is a technical failure, or some other type of problem occurs. Do role-plays to see how your staff answer questions and deal with different situations.
Plan for EventsAir Automated Updates
While it doesn’t happen every day, EventsAir does publish updates on a regular basis.
These updates are always announced in advance, through email communications, client newsletters and version update videos.
Upcoming updates are also mentioned in client webinars.
If you see that an update is planned for a time frame around the time of your event, you may want to “Pin” your current version and avoid having EventsAir updating just before or in the middle of your event. Talk to our Support team for more information.