Note: Depending on your organization and license, the features described here may or may not be available to you within EventsAir.
Managing a tradeshow or exhibition is a big job, so we have a wide range of tools to help you to:
- Create an enjoyable and informative event for attendees
- Offer your exhibitors many ways to gather quality leads and boost sales.
...and to get as much of this possible done through automated, self-managed portals and apps to minimize your workload. You can use EventsAir to:
- Create an attractive and easy method for exhibitors to select their stands (booths) and registrations. At same time, you can automate sales of exhibition booths/stands, track inventory as each booth is sold, record booth size and placement on an interactive floor plan, and take payments (or set up a payment schedule).
- Add extra charges (and take payments for) to cover taxes, insurance, and more.
- Allow exhibitors to update their information, add product brochures, and upload their logo and product/service descriptions, and show these on an Attendee App.
- Provide visitors with an Attendee App to connect to exhibitors and plan their time on the expo floor.
- Make it simple for exhibitors to gather and follow-up high quality sales leads based on stand (booth) visits.
- Offer exhibitors exciting sponsorship opportunities for even more ways to connect with attendees.
- Encourage exhibitor-attendee connections with Meeting Matching for scheduled, face-to-face appointments.
|
NOTE: The tools and portals we talk about in this document are very flexible, so we’re discussing in general terms the set-up, configuration, and how they’re used. Only you and your organization will know the specific steps and processes you’ll need to undertake. |
Overview of the process
Below is a summary of the process involved in setting up Exhibitions:

Step One: Configure Options in Set Up (Exhibitions Module)
There are many ways to tailor your exhibition event set up, including payment settings, and registration options. You can also offer lead management options (which can be a ‘premium feature’ your exhibitors pay more to access).
To make sure the options you want will appear in your websites, apps and portals for this event, start by going to Set-up Panel, choose the Exhibition Module, and create your settings for:
- Preferences (overall settings for your Exhibition event)
- Floor Plan
- Stand Type (and inclusions, such as complimentary registrations)
- Stand Numbers (and Details)
- Additional Charges
- Exhibitor Checklist
- Brochure and Document Categories
- Exhibitor Documents
- Virtual Exhibition Hours (if applicable)
- Suggested Lead Management Questions
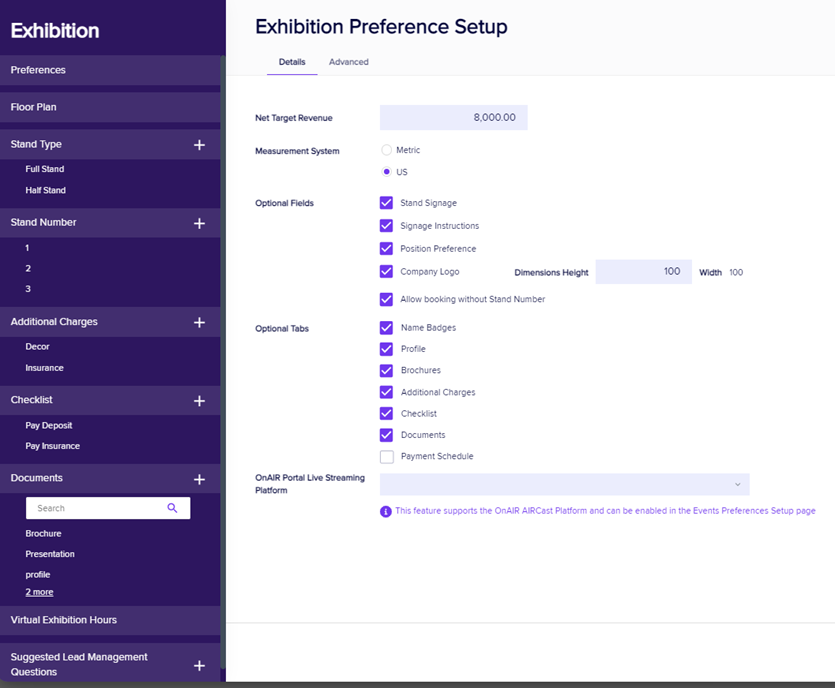

Set up – Exhibitions – Preferences
Under the Preferences – Details tab, you’ll find:
- Net Target Revenue – you can enter an amount here as your target for exhibition sales. Your target versus actual sales amount is shown in the Targets widget on the event Dashboard.
- Measurement System - Metric or US (Imperial).
- Optional Fields [Set preferences here so you can add them to your Exhibitors portal / include them on the exhibitor’s record]
- Stand Signage – template-designed signs or placards for exhibitors to add their logo. (Organized either by you or a contractor.)
- Signage Instructions - number of letters, size, etc.
- Position Preference - lets exhibitors indicate a preferred location (e.g. near entrance; to the right of the stage).
- Company Logo – lets exhibitors know the size of the image they can upload. Set the maximum height (in pixels). The width will be auto-set to match the height. Any logos uploaded will be re-sized to these dimensions. (See separate information about image sizing if logos appear pixilated or poor quality. You may need to give your exhibitors clearer image guidelines.)
- Allow booking without stand number - this makes it possible to just select the type of stand (to access certain features), and select the actual stand number later.
- Optional Tabs [Most of these will appear on the Exhibitor portal; some are for the Attendee App and/or Event website]
- Name Badges – to submit names for extra badges (in addition to contacts with a record)
- Profile - to enter a short company profile
- Additional Charges– to set up extra charges for goods or services you want to upsell to exhibitors, (e.g. insurance, decor, lead management, equipment, etc.). Your exhibitors can select which ones they want from a list. (If you want to make extra charges mandatory, include them in your Stand Types.)
- Checklist – a list with dates that can be added to attendee records, to help you track each exhibitors’ essential tasks. You may not need this, though, because the Exhibitor Portal includes a list of ‘must-haves’ for each stand booking.
- Documents – to collect documents (to share through emails, website, attendee app etc.) These don’t have to be actual documents – exhibitors can add a link to a website or video, for example.
- Payment Schedule - you can define your exhibitor Payment Schedule, (for example that a 10% deposit will be invoiced on March 1st, the next 50% on June 1st, and the remaining 40% on September 1st). You should include:
- The percentage of each payment
- Invoice date for each payment
- Terms - number of days to pay
- Due dates - calculated automatically from the Invoice Date, and Term
- Brochures - a company brochure can be uploaded directly, or exhibitors can provide a link to one.
Advanced Exhibitor Preference Details
- Valid Payment Status- the default payment statuses are Purchase, Inclusive, Complimentary, and Canceled. However, you can also enable other payment statuses, such as:
- No Charge
- Own Expense
- Invited
- Not Attending
- Not Required
- Deposit
- Charge to Another Contact
- Split Charge
- Waitlist Purchase
- Waitlist No Payment Required
- Invoice Group - if you have defined these in Financial Settings, you can select one here.
- Credit Hours/Points - if you have defined continuing education credits for this exhibition, you can assign points or hours here.
- Income Account - you can point exhibitor booths to a specific Income Account code here.
- Tax - if you are charging tax, you can define the tax type and rate here.
- Cancelation Fee and Tax - If you are setting a default cancelation fee (with applicable tax) you can define that fee here.
Set up - Exhibitions – Floor Plan
Recommended process
Your online Interactive Floor Plan allows exhibitors to select in a couple of clicks the specific stand (booth) and location of their choice.
To set up the Exhibition Floor Plan, we recommend the following process:
- Sketch out a rough floor plan based on your venue’s measurements and work out the approximate number of stands and their dimensions.
- Define stand types and create stand numbers (in Set up – Exhibition module).
- Create your floor plan (in Set up – Exhibition module), starting with an outline of walls, exits, stages etc., then drag and drop each stand number into the floor plan.
NOTE: You can, instead, create your floor plan first, numbering each stand and creating stand types as needed. This will automatically add stand types and numbers to your inventory. However, setting up stand types and numbers first, then dragging them from the gallery onto your floor plan, helps you set up a logical numbering system from the start.
- Create and publish your Exhibition Portal App to include the floor plan and define how it’ll be displayed.
There’s also a feature in the Express Actions panel allowing you to drag-and-drop Exhibitors to available stands. When doing this, be careful not to confuse ID number and Stand number.
Creating and editing the Exhibition Floor Plan
- Import an image – If you want to, you can insert an image (PNG or JPG) to use as a background/template for your floor plan.
- Move around the floor plan grid– The grid is always shown in meters (but stand dimensions will be in feet if you’ve set US/Imperial as your measurement preference).
- Zoom in or out using the scroll wheel on your mouse, or use the plus+ and minus– magnification slider (lower-left corner of the grid).
- If you zoom out too far and accidentally try to place something outside the boundaries of the plan (0,0 on the X,Y axis), it will bounce back.
- Use the “Auto Fit” tool to have your floor plan fit your screen once more.
- Define Stand Types – Creating stand types and assigning them names in the floor plan builder will automatically add them to your stand type inventory. However, we recommend defining these beforehand in the Stand Type and Stand Number, so that they’ll appear as options in your floor plan gallery.
- Drag and drop – Depending on what you’ve already set up, you can add stand types or your actual numbered stands from the gallery on the right.
Modify and edit – Click any stand (booth) to either:- Rotate it - Using the rotation handle at the top
- Add extra details using the Setup Cog – See who is allocated to the stand (booth), give it a number, define dimensions, and/or add colors/line weights to set how it appears on the floor plan.
NOTE: If you renumber a stand, and you’ve accidentally used a Stand Number twice, you’ll get a warning that it’s not a unique number when you try to save. However, multiple duplicates can make this more difficult to fix. This is another reason to number stands before adding them to the floor plan.
- Add shapes – From the gallery to the right of the floor plan, you can drag and drop shapes for tables, podiums, presentation spaces and other physical elements of your exhibition hall layout.
Save any changes before closing your Floor Plan. Once the plan is live on your Exhibitor Portal, changes made there will reflect on the plan here and vice versa.
Floor Plan – Tools Guide:
|
|
Pointer – return to using the pointer at any time by selecting this option |
|
|
Polygon – draw shapes (up to five-sided) |
|
|
Polyline – draw any number of lines to create any shape you need |
|
|
Select all – automatically selects all objects in the builder |
|
|
Cut – cuts your selected object and save it to the clipboard |
|
|
Copy – copy your selected object to the clipboard |
|
|
Paste – paste the content in the clipboard into the builder |
|
|
Clone – select one or more items and create exact copies of items and layout |
|
|
Delete – delete selected item(s) |
|
|
“Send to back” – stack (superimpose) multiple images and place one of them behind all other stacked items |
|
|
“Send backward” – moves a stacked image one layer back (behind another image) |
|
|
“Bring forward” – moves a stacked image one layer forward (in front of another image) |
|
|
“Bring to front” – brings one item to the very front |
|
|
Align left – lines up a group of selected items by their left-hand edge |
|
|
Center – lines up a group of selected items to their (horizontal) center |
|
|
Align right – lines up a group of selected images by their right-hand edge |
|
|
Align top – lines up a group of selected images to the top edge |
|
|
Align middle – lines up a group of selected images to their (vertical) center |
|
|
Align bottom – lines up a group of selected images to the bottom edge |
|
|
Tools – shows snap options (whether objects automatically line up with nearest gridline) |
|
|
Undo – reverses the previous action |
|
|
Redo – re-does the previous action |
|
|
Insert image – you can add an image into your plan |
|
|
Download image – you can download an image of the floor plan |
|
|
Download PDF – save and download a PDF of your floor plan |
|
|
Number vertically – will number all stands from top to bottom |
|
|
Number horizontally – will number all stands from left to right |
|
|
Autofit – will zoom in or out to make the plan fit your screen |


Set up – Exhibitions – Stand Type
Stand Type is where you define stand (booth) categories, which is helpful when you’re setting up the Exhibition Floor Plan. Each trade show or expo varies, and common stand types include:
- Standard stands
- Island stands
- Premium stands
- End stands
…but you can really add anything you wish to suit the needs of your exhibitors.
When you add a new Stand Type, you’ll see the below – note that the unit of measurement (meters or feet) will depend on whether you chose metric or US/Imperial in Exhibition Preferences:
- Stand Type – give your stand type a name
- Default Width – list default width (meters or feet, depending on what you set in preferences)
- Default Depth – list default depth
- Default Area – area is auto-calculated (Width x Depth), but can be manually entered for unusual areas
- Default Height – list default height
- Default Space Only Amount – list the price of ‘space only’ stands/booths if that’s your default
- Default Standard Amount – on the other hand, if you are selling pre-set booths in a Shell Scheme format, list that default price here
- Available, Reserved and Confirmed Colors – you can set colors for each of these (to indicate on the exhibition floor plan whether a stand is available, reserved, or confirmed).
- Include Package – you can link a package (including items such as accommodation) with the purchase of the current stand
- Number of Complimentary Registrations – enter how many complimentary registrations you want to allow for this stand type. You also need to create interactive site(s) for each registration type required, and add links to the Exhibitor Portal.
- Rank – you can indicate what ranking order you want to give this stand type when listed in the Attendee App and in Event Website / Info Websites (e.g. 1 for first, 2 for second.)
- Rank Heading – Enter the text for a heading if you've created ranks
More about setting up complimentary and paid registrations
It's quite common to include complimentary event registrations as part of a stand booking. You can set this up by nominating the ‘Number of Complimentary Registrations’ in Stand Type setup.
- You can also allow exhibitors to book extra paid registrations.
- Set up interactive forms (sites) to capture registrations, with a different interactive site for each type of exhibitor registration (complimentary and paid). You then add these interactive sites to the Exhibition Portal (under Existing Bookings). This allows exhibitors to submit the details for the Complimentary and Paid registrations they require.
- You should also make the contact details non-editable after initial entry.
If you want to entice your exhibitors by adding extra items such as complimentary functions to complimentary registrations, you can set up a package (in the Set Up panel, under Packages) that adds extra items to complimentary packages.
Set up – Exhibitions - Stand Numbers (and details)
You can include details for each individual stand number, based on whether your expo is offering:
- Space only sales - this is where the Exhibitor purchases a space on the expo hall floor and brings in their own booth and decor. (The organizer will usually set up a pipe/drape to separate each space.)
Or - Booth sales - sometimes referred to as Shell Schemes, these are pre-set booths/stands, typically set with walls and carpeting, and sometimes power and standard furniture (each organizer will set up these pre-set booths differently). Each Exhibitor adds their own posters, banners and other decor items.
The settings you can define in Stand Number setup are:
- Stand number – it helps to use a consistent numbering format here, such as A01 (row and number)
- Width – the width of this stand/booth
- Depth – the depth
- Area – area is auto-calculated (Width x Depth) but can be manually entered for unusual areas
- Height – height of this stand
- Open Sides – depending on the booth location, a booth can have 1, 2, 3 or 4 open sides
- Space Only Amount – if you are selling just the space for this booth, list that price here
- Standard Amount – if this is a pre-set booth in a Shell Scheme format, list that price here
Set up – Exhibitions – Additional Charges
Under this section, you can add any other items or services for which you want to charge your exhibitors, such as:
- Insurance
- Load in-load out
- Decor
- Lead retrieval functionality
- Hospitality
- Computer equipment
- Power
To allow exhibitors to order these, add them to the Existing Bookings page content when you set up your portal.
Setting Up Additional Charges
The fields in Additional Charges are:
- Name – the name of the charge.
- Amount – the amount payable.
- Type – select what type of charge this is:
- Checkbox (simply indicating yes to the item).
- Quantity (indicating how many of that item they wish to purchase).
There is no limit to the number of Additional Charges you can create.
Working with Exhibition Services companies
The types of goods and services you would list under Additional Charges are often provided by an Exhibition Services company. (EventsAir Live Event Services can also offer some of these). An external events services company can help you develop a comprehensive list of items you may want to charge out as part of booth costs, such as:
- Pipe and drape (space only sales)
- Custom booths
- Electrical services
- Decor and Furniture services
- AV services
- Shipping and material handling coordination
- Advanced and onsite support to exhibitors
EventsAir makes it easier to work with an external service provider because you can:
- Give your Exhibition Services Company online-accessible reports and information about booth/stand sales, exhibitor details, and more.
- Give your Exhibition Services Company checklist reports that detail which items from specific exhibitors have or have not been completed or submitted.
- Coordinate communications with your Exhibition Services Company.
- Create a dedicated Exhibition App in the EventsAir App Store for use by your Exhibition Services Company vendor.
Set up – Exhibitions – Exhibitor Checklist
The Exhibitor Checklist is a way for you to keep detailed notes on the attendee record with dates attached to action items your exhibitors have completed by the relevant dates, such as:
- Deposit paid
- Final payment
- Insurance nominated
- Lead retrieval equipment ordered
- Sent profile
- Sent details for name badges
- Submitted room list
Enter the name of the checklist item, indicate if it is required by default, and the default due date for delivery. The checklist appears on the attendee record of each exhibitor for you to note completion of tasks.
NB there is also a ‘checklist’ of sorts on the Exhibitor Portal, which lists items you’ve asked for on the portal. Your exhibitors can use to this to see whether they’ve completed all required steps (the boxes are ticked when items are completed).
Set up – Exhibitions – Exhibitor Documents
You can define your document types here so that your exhibitors can upload them via the Exhibitor Portal. (You can also upload them manually.) They don’t have to be ‘documents’ as such, because you can select from the various types below, including URLs to allow for videos, websites, and digital brochures to be included.
Brochures can be made visible on the attendee app. Brochures or other documents can be added to thank-you emails.
When you set up your document types, you can define the following:
- Name
- Type:
- Uploaded Document
- Plain Text
- Image
- Link
- Size Limit - lets you define (in Kilobytes, words, or characters), a size limit for each document. If your documents are being stored in AirDrive, there is a limit of 5MB per document.
- NOTE: If exhibitors decide to add a document to a lead question, it must be a PDF less than 500kb, and will appear on screen during the lead capture process.
Set up – Exhibitions – Virtual Exhibition Hours
Including remote attendees to your exhibition or trade fair allows your exhibitors to reach anyone, anywhere, anytime.
Set the dates and times that your virtual exhibition is open and available to attendees via the OnAIR portal as well as the Attendee App.
Attendees in the OnAIR Portal and Attendee App can also browse exhibitor stands and view exhibitor brochures and videos if available.
In addition, during the open hours of the virtual exhibition, attendees can request text and video meetings with available exhibitors and participate in any scheduled stand presentations.
You can enter as many different dates and times as needed for your specific virtual event.
NOTE: Remember to select Update Time Slot to save specific schedules, then Save all of your schedules.
For more information, see the separate section on running Exhibitions through the OnAIr portal.
Set up – Exhibitions – Suggested Lead Management Questions
You can set up one or more suggested lead management questions to help your exhibitors know what to ask visitors to their stand (either in person or virtually). The questions are not shown directly to visitors on their attendee app; the staff at the booth or stand use their attendee apps to ask visitors questions as part of lead scanning.
You can create suggested questions, set response types, enter an external reference (such as a website) and more.
- Question - enter the question here
- Response Type - Choose from these response types (you also need to add valid responses below the question in some cases) :
- Comment Box
- Date
- Multiple Choice (one answer)
- Multiple Choice (one or more answers)
- Number
- Ratings 1-5
- Single Text Box
- True / False
- Yes / No
- Mandatory – makes it mandatory for the stand visitor (lead) to answer the question if it’s included. [Exhibitors can change this setting.]
- Do Not Allow Exhibitor to Remove – exhibitors can’t remove this lead management question.
- Automatically Add to Exhibitor Portal – adds the question to each exhibitor’s list.
Note – You MUST set these up before any stands are booked for them to work as intended. They won’t work retrospectively if stands have already been booked. Exhibitors can still edit questions and some settings even if the above are selected.
Step Two: Interactive Sites
If you haven’t already done so, you’ll need to create interactive sites to add to your Exhibitor Portal.
- Create account site (form) – where any prospective exhibitors can create a new contact record before booking a stand.
- Complimentary registrations site (form) – for exhibitors to submit names and details for complimentary registrations included with their stand type.
- Paid registrations site (form) – as above, for paid registrations.
- Payment page – to add to your Exhibitor portal if you’re accepting payments online. (See other resources to help you with setting up online payment pages and gateways).
 Step Three: Configuring the Exhibition Portal (App)
 Step Three: Configuring the Exhibition Portal (App)
Exhibitors use this portal to book, review and manage their own exhibition stands. The Live Floor Plan lets them view and select available stands from the floor layout, and see which stands are remaining, in real time.
They can also see payments and outstanding invoices, and any payment schedules you’ve set up in preferences.
NOTE: As mentioned in the previous section, you’ll need to have created some interactive sites (online forms) before creating the portal.
Exhibition Portal - Details tab
- App Name
- Alias - set the unique portion of the URL here
- Copy URL and Copy QR Code – to give others the URL or code to download the app
- Live Floor Plan - used to display the live floor plan in other websites or provide the link in email communications. Unlike in the actual portal, this link will only display the list of Exhibitors and available booths. Booths can’t be purchased by clicking on them.
- Brand - set up in the Brand Editor
- App Live From & To Dates - choose the date range
- Authentication - select what attendee categories can access the Exhibition Portal
- App Pre-Open – if applicable, create a Heading and Message for those trying to access this portal before it is live
- App Closed – similar to above
Exhibition Portal - Settings tab
Nominate your preferred settings here (otherwise it will use the default settings):
Mode:
- Select “Show Stand Numbers” if you want exhibitors to book based on a specific stand number (which you’ve previously set up with details and inclusions)
- Select “Show Stand Types” if you’d simply like exhibitors to book a stand type, and you can later allocate them a number.
Stand Amount:
- Select “Display Standard Amount” if your set up includes booth/stand space plus extras included in the standard booking
- Select “Display Space Only Amount” if your set up allows people to book ‘space only’ and do their own fit-out (shell scheme set up).
Exhibition Stand Allocation (for "Stand Type" bookings)
This is the process to use if you want your exhibitors to just book stand types rather than specific stand numbers.
- First enable Allow booking without Stand Number in Exhibition Preferences.
- In your Exhibitor Portal set up, allow bookings by Stand Type.
- Then you can use this tool under Express Actions to easily allocate Exhibitors to vacant booths/stands on your floor plan.
Tip: If using this tool, be careful not to confuse Stand number with ID number.
Go to the Express Actions Panel > Stand Allocation.

On the left, you'll see your Exhibition Floor Plan. You can use the Zoom buttons to better see details of the Floor Plan and click and drag to see other stands. Use the Search button to find an Exhibitor by searching on their Name and Organization, or use the Filter button to make a more complicated selection.
To Add an Exhibitor to the Floor Plan:
1. Change the Show Exhibitors Who Are radio button to Unallocated.
2. Select one of the Exhibitors. All available stands of the correct Stand Type will be colored on the floor plan.
3. Drag and Drop the Exhibitor onto a colored Stand on the Floor Plan to update the booking with the desired Stand Number.
To Remove an Exhibitor from the Floor Plan:
1. Change the Show Exhibitors Who Are radio button to Allocated.
2. Select the Exhibitor in the list.
3. Press Unallocate.
Exhibition Portal - Content tab
Along with the settings below, some basic text content and default headings are included for each page. However, you should review these carefully and add/edit your own content, using the Content tab.
- Navigation – You can change the top menu for the Exhibition Portal.
- New Account Page - before a user can book a stand at your exhibition, they need to create an account (via an interactive site you’ve set up separately). There is some text already automatically included, but you can tweak this message by pressing the Content - Open HTML Editor button.
- Landing Page - this is the first page the user will see. You can change the Heading, the Content of the page, and the Heading for the list of Available Stands.
- Home Page - a simple welcome page where you can include any necessary instructions, or messages to all exhibitors.
- New Booking Page – Again, there is default text here, but you can change it. You can alter the heading, edit the Terms and Conditions instructions, and choose if you want to make the Floor Plan visible. Also, you can nominate a Merge Doc that will be automatically emailed to an exhibitor when they book a stand, and raise an alert when a new booking is made. Your alerts can include both a default phrase as well as the name and ID number of the new exhibitor.
IMPORTANT: The default terms and conditions content refers people to your event website to download and read your T’s and C’s (Terms & Conditions). Be sure to add this content, either directly on your event website or via link to a suitable document, before enabling the ‘include Terms & Conditions’ setting and checkbox.
- Existing Bookings Page – Add/edit text for, and enable/disable the following features:
- Heading – (usually “Existing bookings”).
- Content – Open the HTML editor to adjust the text at the top of the page.
- Hide Stand Financial Information – Check this box to hide the stand financial details from all views and reports.
- Include Company Profile – Check this box to include the company profile in stand listings in the Mobile Attendee App.
- Include Stand Signage – Check this box and complete the needed text for instructions on providing stand signage details.
- Include Complimentary Registrations – Check this box to enable complimentary registration from the Exhibitor Portal.
- Complimentary Registration Label – Edit the label for your complimentary registration option here.
- Complimentary Registration Interactive Form – Enter the Interactive site (form) to be used for complimentary registrations here.
- Include Additional Paid Registrations – Check this box to let your exhibitors register additional team members for your event, for a fee.
- Paid Registration Label – Edit the label for your complimentary registration option
- Paid Registration Interactive Form – Enter the Interactive site (form) to be used for complimentary registrations here.
- Set Maximum Paid Registrations – Enter how many extra paid registrations are allowed
- Include Name Badges – Check this box to enable the collection of name badge details for your stand personnel
- Include Brochures – Check this box if you wish to include company brochures that can be viewed in the Mobile Attendee App
- Include Logo – Check this box if you wish to include a company logo that can be viewed in the Mobile Attendee App
- Include Order Additional Items – Check this box if you wish to include the option to order additional items from the Existing Bookings page
- Include Cancel Booking Button – If you allow cancelation of bookings, check this box and set the final date you will accept cancelations. If you do not want to allow cancelations, simply do not check this box.
- Include Additional Information – Check this box if you wish to allow exhibitors to submit additional details about their company or services. This information can be viewed in the Mobile Attendee App.
- Fields 1-10 – These optional fields can be used to collect additional details when you enable the ‘Include Additional Information’ setting.
- Update Contact Details Page - set up the page Heading and Content, as well as a simple Update Contact Interactive Site (form) - the interactive site used to update Contact details.
- Invoice and Payment Page - set up the page Heading and Content, as well as Heading and Content for:
- Payment Schedule
- Invoice Section
- Bank Account Details
- Payment Interactive Site – a separate payment site you have set up to accept payments.
- Additional Pages - set up Menu Navigation text, Headings, and Content for up to 3 additional static pages. These pages can contain any extra information you want to give to your exhibitors.
- Additional Interactive Sites - you can include up to 3 extra interactive sites here. The registration buttons will appear on the "Existing Bookings" page, next to each Stand. You could use these for accommodation bookings, for example.
Exhibition Portal Content tab - Lead Management set up in more detail
- Lead Management Setup - you can configure Lead Management settings here (enable Lead Management, enable Lead emails, and define what stand types have Lead Management functionality available to them).
This allows you to sell stands at different prices. For example, a Corner Stand Basic may NOT have Lead Management services, but a Corner Stand Deluxe might cost more, because they have Lead Management services available. Enabling lead emails means your exhibitors can set up, via the portal, automatic thank you emails to visitors (including attachments). They can create lead alerts, for example to sales people back in the office. They can also see and export sales leads.
- Enable Auto Thank You Emails - This email will be automatically sent to the attendee visiting the booth once the transaction is complete. You can even include an attachment to this email (such as a PDF flyer).
- Enable Lead Alert Email - This email is sent to the designated exhibitor team member, and contains the new lead details just captured at the booth. Answers to the profile questions are included in this email.
- Enable Suggested Questions Button - When selected, this will enable Suggested Questions, allowing exhibitors to select from a list of pre-written lead management questions provided by the event organizer. (You set up the Suggested Questions in the Set up panel, under Exhibitions).
- Enable Request Info Options - when selected, The Request Info option is made available in virtual exhibitions and in sponsored sessions. When Request Info is selected, attendees can answer lead management questions and are then added to the exhibitor's list of collected leads.
- Lead Management Current Leads - configure the settings for how each exhibitor will view the current leads captured by their Lead Management activities. You can also create instructional text and control the number of leads displayed on the search results page.
- Floor Plan - these options allow you to fine tune how your Exhibitor Floor Plan operates. Settings include:
- Hide Organization on Floor Plan - removes the Organization name on the stands displayed in the Exhibitor Floor Plan
- Use Stand Signage field instead of Organization - replaces the Organization name on the stands with the text contained in the exhibitors' stand signage.
- Truncate Organization on Floor Plan - this option will truncate the Organization name in cases where long names cause the text to shrink in size
- Show list of Exhibitors on Floor Plan - this option displays a list of Exhibitors on the floor plan, and clicking on an Exhibitor name in the list will highlight that Exhibitor's stand
- Include Co-Exhibitors in List
- Hide Exhibitor Profile in Exhibitor Pop-up
- Hide Exhibitor Email in Exhibitor Pop-up
- Hide Exhibitor Website in Exhibitor Pop-up
- Allow Booking - this will allow bookings to proceed if a stand is clicked on in the Live Floor Plan
- Stand Highlight Color - lets you define the color when a stand is highlighted
Exhibition Portal - Localization tab
The Localization tab can be used to give alternative spellings or wording where needed. For example, your exhibitors may prefer the wording “Sign Out” to “Sign Off”.
You can also use this feature to create a Exhibition Portal in other languages. You can set up a language in your event, manually change the labels to override the default, and then apply it to a particular site. You would then change the default for each label in the Exhibition Portal. You’ll need to create a portal for each language. All global Localization settings for Language are configured in Application Setup, Language. Open the App Store tab, and select the App you are working with. Note that changes made in Application Setup will affect all events. However, you can still make unique local changes for each portal in each event, here in the Portal Setup.
- Override App Default Language - tick to enable this feature
- Base Language - choose the language for this Portal
- Search - to speed up finding a text string in the list, you can filter the list with the Search field
- Original - the original text string
- Language Override - enter the text for the Language you want. This will default to the setting from Language Setup for this app, but you can also change it here if you need a special text string unique to this portal.
Step Four: Helping exhibitors make the most of the portal
Your exhibitors (existing and potential) are the ones who will be using the Exhibition Portal to:
- See the floor plan and select and purchase booths/stands
- See invoices and submit payments
- Update contact details
- Submit deliverables
- Manage their profile questions and thank you emails, see and export details of sales leads (visitors)
- Access additional pages if you’ve set these up
Here’s how they’ll experience the portal, depending on what features you’ve enabled:

Landing page
Visitors to this page see a list of available stands, and the Live Floor Plan (showing which stands have already been booked, and by whom – if you’ve enabled that). A user must create a new account (for a new booking) or sign in (to their existing booking) to review, update, or use other functions.
Home page
Your welcome message and any further instructions.
New Booking page
After entering their contact details, an exhibitor chooses Standard or Space Only. Then, a Stand Type or Number (depending on what you’ve set up). After ticking the checkbox to agree to your Terms & Conditions [which you’ve set up on another site, or linked to in the HTML content], they press "Book Stand" to create the booking.
Existing Bookings page
Users will see the details of their booking, including any outstanding payment amounts. Each booked stand will also have a checklist of items that need to uploaded or supplied. These will be automatically ticked when they’re done.
Floor Plan
The Live Floor Plan shows the layout of all stands on the exhibition floor, and real-time information about who has booked each stand (although you can hide this from users if you wish). Exhibitors use the Floor Plan to choose the best location.
Update Contact Details
This page shows an interactive site where details can be updated. The "Submit" option updates information.
Invoice & Payment
Exhibitors can see a summary of bookings and purchases, payment status, payment schedules, and invoices.
Leads Setup
Each exhibitor whose stand type includes lead management can tailor various aspects:
- Questions – Exhibitors can tell their staff which questions to ask visitors (either in-person or in the OnAIR portal), define questions in their chosen formats (e.g. text entry, multiple choice). They can also hide, edit, or add questions.
- Auto Thank You Email Setup - If you enabled Auto Thank You Email in the portal setup, your exhibitors can create an email that will automatically go to people who visit their stand/booth (including an attachment).
- Lead Alert Email Setup - If you enabled Lead Alert Email in the portal setup, your exhibitors can email someone in their company with details about leads who visited (including responses to questions).
Current Leads
Exhibitors can see list of leads collected at their booth or stand. Options include:
- Attendee Detail - clicking a name shows details (responses to profile questions, date/time of visit)
- Export - generates a spreadsheet with all information collected on attendees visiting your booth or stand
- Map - displays geographic indicators for every visitor
More about lead management
Lead Management allows exhibitors to scan the bar code or QR code on an attendee's name badge or attendee app when they visit the exhibitor's booth, quickly capturing key details and suggesting questions during their visit.
- Automated emails can be configured to send a thank you email to the attendee.
- Alerts can be sent to people within the exhibitor's company (such as the sales team).
Staff working on the exhibition booth/stand can use their Attendee App to capture leads, collect answers for the custom profile questions, and see a list who’s visited their booth. This information can also be seen and exported from the Exhibitor Portal.
This functionality is available for virtual exhibitions as well. Exhibitors can see and ask lead management questions when an attendee connects via text chat or video call, and show questions to any attendee who chooses the Request Info option.
Lead management must be configured by adding it to Stand Types (either all, or some) and in the Content tab of the Exhibition Portal.
You can also create Suggested Lead Management Questions in Set Up – Exhibition Preferences, but this is optional.
Once enabled, you need to communicate with your exhibitors on how to configure and use Lead Management.
Each exhibitor should individually open the Exhibitor Portal and finish setting up their Lead Management details. If their purchased stand type includes Lead Management, they will see a Leads drop-down menu in their Exhibitor Portal. (Other exhibitors won’t see this.)
We have a separate guide you can give your exhibitors on how to do this. See the Related Articles section.
Who can use Lead Management?
Exhibitors with lead management enabled can Scan and View Leads on their Attendee App if:
- They’re assigned (as an Exhibitor or Co-Exhibitor) to a stand that has Lead Management enabled
- They’re the Group Leader of a group with an exhibition item
- They’re members of a group with an exhibition item, where Allow Exhibitor Group Members to Access Leads and Meetings is enabled;
OR
- They are co-exhibitors with their own exhibition item.
Then they can:
- Log in to the Attendee App - Exhibition booth personnel can log in to the attendee app using the login name and password of the primary contact person who purchased the booth. They could use their own app, provided Allow Exhibitor Group Members to Access Leads and Meetings is enabled.
- Select Scan Leads - this puts the attendee app into scan mode, ready to either scan a bar code/QR code, or enter the name of the visiting attendee.
- Scan the Attendee Badge - selecting Scan Lead allows the device’s camera to scan the attendee's bar code or QR code. Alternately, part or all of a name can be entered to search for the attendee.
- Answer Profile Questions - once the contact's details are displayed, answers to the profile questions can be entered (if enabled by the exhibitor). Once the submit button is pressed, the lead details are collected, and if enabled, a thank you email is immediately sent to the visiting attendee.
-
- Request Info option – see the section below on Exhibitions through the OnAIR portal
Remote & Hybrid events – Exhibitions through the OnAIR portal
If you’re going to the trouble of setting up an event or exhibition, adding a virtual element can bring you and your exhibitors a huge reward for very little extra effort. Worried about locals not attending your event? You can filter, in the OnAIR portal, using your normal EventsAir filters, so that only attendees from outside your live geographic region can access the virtual exhibition.
If this is of interest, you may want to also use the search bar on this website to find information about managing virtual exhibitions in OnAIR 2D Mode and 3D Mode.
When you’ve set up your Virtual Exhibition in the OnAIR Portal, make sure you’ve also set up Virtual Exhibition Schedules in the Setup Panel, under Exhibitions to enable virtual visits to take place.
The Exhibitions section in the OnAIR portal allows you to enable useful tools such as profile widgets, marketing tags, a resource gallery and more. These settings let you enable a virtual exhibition in OnAIR and configure other related options, such as:
- Enable Virtual Exhibition – check this box to enable the Virtual Exhibition in OnAIR
- Exhibition Access for Attendees - choose either all attendees or select specific attendees using the target group (filter) option
- Exhibition Name – enter the exhibition name
- Meet Button Text – enter the text for the button that allows attendees meet with an exhibitor
- Heading - enter the heading for your virtual exhibition
- Description - enter the description of your virtual exhibition
- Enable Exhibitor Analytics - check this box to enable the Exhibitor Analytics link from each stand in the virtual exhibition
- Exhibitor Profile Widget – Exhibitor More Information – choose the Merge Doc that contains additional information about a specific exhibitor. This is set up in Merge Docs, usually without a header - you merge in content from the Exhibitor Contact Record
- Attendee Profile Widget – Attendee More Information - choose the Merge Doc that contains additional information about a specific attendee. This is set up in Merge Docs, usually without a header - you merge in content from the Attendee Contact Record
- Options
- Enable Lead Management Widget – select this so exhibitors can show lead management questions
- Enable Meeting Recordings – lets attendees or exhibitors record the instant meeting. Both parties in the instant meeting must agree to the recording. NOTE: This function is only available if you are using Twilio and NOT AIRCast as your streaming service.
- Enable Video Brochure Gallery - displays exhibitor videos in a gallery view below their stand details
- Enable FAQ Widget - displays the FAQ Widget where exhibitors can create FAQs and responses for visitors to their stand to view
- Enable Live Presentations - turns on the ability to schedule presentations at the Exhibition stand. (See Exhibitor Live Presentations for more information)
- Advanced Search – You can define up to five marketing tags that collect profile or other information (during online registration) about your exhibitors. These marketing tags are used in the Advanced Search function in the Virtual Exhibition.
- Resource Gallery
When enabled, the Exhibitor Brochure Gallery is added to the Resource Gallery and displays all exhibitors and their available brochures in a searchable grid. Attendees can preview videos or brochures for each stand, view exhibitor details and if the exhibition is live, jump directly to visit a specific exhibitor stand.- Add Exhibitor brochures to Resource Gallery - select this option to enable the Exhibitor Brochure Gallery to the Resource Gallery
- Exhibitor Gallery Name – Enter the name of your gallery
- Exhibitor Gallery Instructions – instructions for how to use the Exhibitor Gallery here
- Number of Documents per Page – how many exhibitors per page
- Options
Exhibitions in the OnAIR portal
Virtual Exhibitions - Live Presentations
Exhibitor Stand Presentations
When enabled, each exhibitor can schedule presentations from their stand during the live exhibition hours. Attendees can choose any presentation they wish to attend from a list of current and upcoming presentations.
When attendees visit the Exhibition Hall, they will see a display of upcoming presentations, and in 2D mode, there is a tab to view all scheduled presentations from all exhibitors.
Exhibitors can have up to 40 attendees at any presentation, and attendees can join a presentation in advance and can mark their favorite presentations using a star.
Presentation Formats
Exhibitors can present in Webinar Mode, which is similar to a Poster Presentation where the audience sees the presenter and all attendees are audio only. Alternatively, they can also choose to present in Interactive Mode, which is much like a breakout room where all attendees' and exhibitors' cameras and audio are enabled. Presenting Exhibitors can switch between modes during a presentation and can easily screenshare.
Setting Up Exhibitor Presentations
 Exhibitors can visit the OnAIR portal in advance of the virtual exhibition and can set up their presentation details. The exhibitor simply expands the Live Presentation Schedule Widget and completes the following information:
- Topic - title of the presentation.
- Description - description of the presentation.
- Date - date of the presentation. This information comes from the Virtual Exhibition schedule you set in the Exhibition Setup Panel.
- Start Time - starting time of the presentation. This information comes from the Virtual Exhibition schedule you set in the Exhibition Setup Panel.
- Duration - how long you want to schedule this presentation for.
- Format:
- Webinar - participants show audio only. The presenter shares their audio and video
- Interactive - both participants and presenter share both audio and video
- Tools - choose which attendee tools you wish to enable:
- Discussion Forum / Chat
- Live Q&A
- Raise Hand
Starting Exhibitor Live Presentations
Once you have one or more live presentations scheduled, your exhibitors will see the schedule of live and upcoming live presentations in their Stand or in their AIRTouch Device (3D Mode). This displays as countdown timer for upcoming presentations, attendance numbers for current presentations, and the option to edit or delete presentations as needed.

Joining as host will bring you into the Live Presentation area, where you have the typical control options as shown here:

- Start / End Presentation
- Start / Stop Camera
- Mute / Unmute Mic
- Share Screen / Stop Share
- Live Q&A
- Participant List
- Invite Guest
- Tools
- Maximize
Exhibitor Lead Management in the OnAIR portal
Lead Management is supported in the OnAIR Portal. If you have enabled Lead Management, your exhibitors will be able to perform all Lead Management actions such as asking profile questions, sending out automated emails and tracking all leads in the Exhibitor Portal.
More about the Request Info Option
If enabled, attendees can request information from exhibitors. This option adds the attendee to the exhibitor’s list of collected leads, and the attendee also receives a thank-you email if this option is enabled.
This option is available in two locations:
- OnAIR Portal Session - if an exhibitor sponsors a specific session, attendees can request info from the session sponsor. When selected, the attendee may be asked to answer one or more lead management questions, and this information is added to the exhibitor’s collected leads list.
- OnAIR Virtual Exhibition - When visiting the virtual exhibition, attendees can request info from the exhibitor instead of a text chat or video meeting. When selected, the attendee may be asked to answer one or more lead management questions, and this information is added to the exhibitor’s collected leads list.
Exhibition Analytics in the OnAIR portal
Exhibition Analytics gives you real-time information across both your entire exhibition as well as for specific exhibitors. You can see and export a variety of Exhibition Reports in the Reporting area of the Analytics Dashboard. As an event organizer, you can view reports for all exhibitors or for specific exhibitors. Exhibitors can see their own analytics.
For both categories, you can view real-time data in these categories:
- Live Pre-Scheduled Meetings
- Live Chat Queue
- Live Meeting Queue
- Live Chats
- Live Meetings
Global Exhibitor Analytics (All)
In additional to the real-time views of exhibitor data, you can view real-time data about these specific areas:
- Live Pre-Scheduled Meeting
- Live Chat Queue
- Live Meeting Queue
- Live Chat
- Live Meetings
Please note that you can view and export a variety of Exhibition Reports in the Reporting area of the Analytics Dashboard.
Individual Exhibitor Analytics (Exhibitors)
In additional to the real-time views of individual exhibitor data, you can view real-time data about these specific areas:
- Live Pre-Scheduled Meeting
- Live Chat Queue
- Live Meeting Queue
- Live Chat
- Live Meetings
You can also see a breakdown of analytical data for specific brochures and see which exhibitors are live at the exhibition.